Natural paints rely on complex oxidation and carbonation processes that are significantly more sensitive to atmospheric moisture than synthetic acrylics.
- Synthetic paints use coalescing solvents to force-dry rapidly, whereas natural binders (oils, lime, clay) need time to interact with oxygen or carbon dioxide.
- High humidity in UK homes stalls water evaporation, leaving the paint film open and vulnerable to damage or tannin bleed.
Recommendation: Do not rely on touch-dry tests; use a hygrometer to ensure relative humidity stays below 65% and maintain gentle airflow for at least 14 days.
It is a scenario every professional painter in the UK has faced, particularly during the damp months of November through February. You have applied a premium eco-friendly emulsion to a client’s Victorian terrace, and three days later, the walls still feel cold and slightly tacky to the touch. The client wants to move the furniture back in, but you know the finish is fragile.
The standard advice found in most manuals—”crank up the heating” or “open all the windows”—can actually be disastrous for natural finishes. Rapid heating can cause clay to crack, while opening windows in a British winter often introduces more moisture than it removes. We often confuse “drying” (the evaporation of water) with “curing” (the chemical hardening of the binder). While modern acrylics cheat this process with chemical coalescents, natural paints require a stable environment to form their molecular bonds.
But what if the tackiness isn’t a sign of failure, but a signal that the paint is still chemically active? Understanding the specific behaviour of plant oils, lime, and clay binders changes how we schedule our work. This article explores the science of patience required for natural finishes and how to manage client expectations in a humid climate.
To navigate the complexities of natural binders and atmospheric moisture, the following guide breaks down the curing process into specific material challenges.
Table of Contents: Managing Application in Humid Climates
- Why Water-Based Paints Block Together if Closed Too Soon
- How to Stop Tanin Bleed Through VOC-Free Primer
- Clay Paint vs Chalk Paint: Which Covers Plaster Better?
- The Scrubbing Mistake That Removes Natural Paint
- When to Paint a Nursery: The 2-Week Cure Rule
- Why Lime Wash Needs to ‘Cure’ Rather Than Just Dry
- Why Modern Vinyl Wallpaper Causes Blown Plaster in Old Homes
- Plaster or Paint: Which Finish Allows Victorian Walls to Breathe?
Why Water-Based Paints Block Together if Closed Too Soon
Blocking—the adhesion of two painted surfaces when pressed together, such as a door against its frame—is the nightmare of any decorator. With traditional oil-based paints, this was rarely an issue once the solvent evaporated. However, with water-based eco-paints, the risk of blocking persists long after the surface feels dry. This is fundamentally a problem of coalescence failure triggered by humidity.
In standard acrylics, strong chemical solvents force the resin particles to fuse together tightly, regardless of the weather. Natural paints, however, rely on the water evaporating first so the binder particles can get close enough to bond. If the relative humidity (RH) is too high, the water cannot leave the paint film. Research on coalescing aids reveals that at 80% RH, the evaporation rate of water drops to 0.09 compared to 0.48 at 0% RH. This stalling effect leaves the binder particles floating in a soup, unable to form a hard, block-resistant film.
If you close a door before this process is complete, the residual moisture effectively re-liquefies the interface between the two surfaces. For the UK painter, this means door frames painted in winter require significantly longer “open time” than the manufacturer’s tin suggests.
Ultimately, patience during the initial evaporation phase is the only guarantee against blocking in a solvent-free system.
How to Stop Tanin Bleed Through VOC-Free Primer
One of the most persistent issues when switching to VOC-free systems is the dreaded “bleed through.” This occurs when tannins—natural compounds in wood—migrate through the wet primer and stain the topcoat with tea-coloured blotches. In a dry environment, the primer dries quickly, locking the tannins in place. In a humid home, the prolonged wet state of the primer acts as a wick, drawing these compounds to the surface.
The chemistry here is unforgiving. Professional painters report that when humidity levels exceed 70%, water evaporation from latex paint can slow by 50-75%, extending the critical window where staining can occur. Unlike shellac-based primers (Zinsser BIN is a staple for a reason) that seal instantly, water-based eco-primers keep the wood fibres saturated. If the moisture cannot escape outwards into the room due to high humidity, it dwells in the substrate, dissolving the tannins.
To combat this without resorting to high-VOC blockers, you must mechanically aid the drying process. Air movement is more critical than heat. A gentle cross-breeze helps shear the boundary layer of moist air sitting on the paint surface, allowing the water to exit faster and “freeze” the tannins in the base coat before they can migrate.
Action Plan for Tannin Control in Humid Conditions
- Points of contact: Identify high-risk areas like knots in pine skirting or oak sills where tannins are concentrated.
- Collect: Gather a hygrometer, a low-speed fan, and a stain-blocking mineral primer (not just a standard undercoat).
- Coherence: Check the RH; if above 65%, use the fan to create indirect airflow across the surface before painting.
- Memorability/emotion: Apply two thin coats rather than one thick coat; thin coats release water faster, reducing bleed risk.
- Integration plan: Allow a full 24 hours between primer coats, regardless of what the tin says, to ensure deep moisture release.
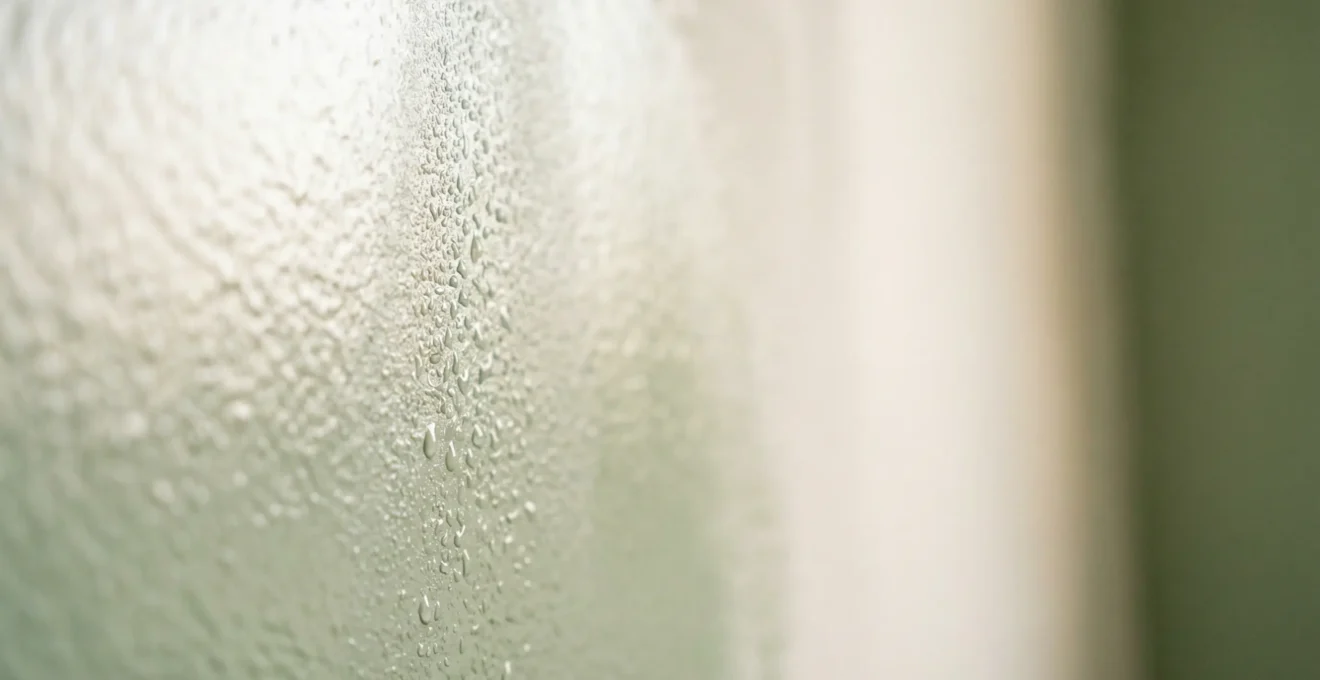
The image below illustrates the stark contrast between a sealed surface and one where moisture has allowed tannin migration.
conceptual clarity > material authenticity.”/>
As seen above, the section on the right demonstrates how prolonged moisture exposure compromises the primer’s barrier properties.
Managing tannins is a test of preparation; managing wall finishes is a test of material selection.
Clay Paint vs Chalk Paint: Which Covers Plaster Better?
When dealing with lime plaster or older gypsum walls in damp properties, the choice often falls between clay paint and chalk paint. While both are marketed as “breathable,” their interaction with humidity and coverage varies significantly. Clay paint is inherently hygroscopic; it does not just sit on the wall but bonds mechanically with the mineral surface.
This mechanical bond is crucial in humid environments. Chalk paints often rely on a binder that forms a more superficial layer, which can be prone to flaking if moisture gets trapped behind it. Clay paint, conversely, buffers humidity, absorbing excess moisture from the room and releasing it when the air is dry. This “breathing” action prevents the build-up of damp that often leads to coverage issues.
To help you choose the right finish for a plaster surface, consider the specific properties detailed below:
As comparative analysis demonstrates, the difference lies in the finish and functional interaction with the wall.
| Property | Clay Paint | Chalk Paint |
|---|---|---|
| Finish | Remarkably flat matte | Dusty matte finish |
| Sealing Required | No topcoat needed | Requires wax or sealer |
| Humidity Management | Absorbs damp, regulates humidity | Porous, less humidity control |
| Surface Transfer | Does not rub off on clothes | Dusty, transfers easily |
| Lime Plaster Compatibility | Excellent, mineral-based | Surface adhesion only |
For a painter, the key takeaway is that clay paint requires less preparation on raw plaster and offers better long-term stability in humid rooms like kitchens, whereas chalk paint is often an aesthetic choice requiring more maintenance.
Selecting the right material is only half the battle; knowing how to treat it once applied is equally vital.
The Scrubbing Mistake That Removes Natural Paint
A common complaint from clients is that their new eco-paint “wiped right off” when they tried to clean a scuff mark a week after painting. This is not a product defect, but a misunderstanding of the curing timeline. Unlike acrylics which form a tight plastic skin within days, natural paints—especially those based on oils or minerals—remain porous and soft for much longer.
The mistake is introducing water and abrasion (scrubbing) to a surface that hasn’t finished releasing its own moisture. Building science research indicates that mold can begin developing on wet materials within 24-48 hours if RH stays above 60%. By vetting a cloth and scrubbing a wall that is still subtly curing, you are re-wetting the binder and effectively re-emulsifying the paint. You aren’t cleaning the wall; you are eroding it.
As the experts at James Alexander Paints note regarding limewash:
Limewash paints do not create a plastic film as acrylics do so they do not allow for the same level of scrubbing without damage.
– James Alexander Paints, Limewash Paint Information & FAQ
Clients need to be educated that “washable” ratings on natural paints only apply after the full cure period, which can be up to a month in a humid UK winter. Until then, dry dusting is the only safe maintenance method.
Treating a natural wall with the same aggression as a vinyl silk finish will always end in tears—and a repainting job.
When to Paint a Nursery: The 2-Week Cure Rule
Expectant parents are often in a rush to get the nursery ready, often leaving painting until the final weeks. When using VOC-free paints, this urgency can be problematic. While these paints are safe because they lack harmful solvents, they still off-gas naturally occurring compounds (like terpenes in orange oil binders) and moisture. The “fresh paint smell” might be natural, but it indicates the air is not yet neutral.
More importantly, the durability of the wall is compromised if the room is occupied too soon. Independent testing for chemically sensitive populations shows that full curing typically takes 7-30 days, with most emissions occurring early on. In a nursery, where humidifiers might be used later, the paint needs to be rock hard before the baby arrives.
The “2-Week Rule” is a safety buffer. It ensures that the binder has fully hardened and that any moisture introduced during application has fully dissipated, preventing potential mould growth behind furniture pushed against the walls.
The image below captures the ideal curing environment: clean, airy, and empty.
atmospheric calm > spatial clarity.”/>
Note the lack of furniture and the potential for airflow, both critical for the initial curing phase.
Planning the nursery project well in advance is the only way to ensure both safety and durability.
Why Lime Wash Needs to ‘Cure’ Rather Than Just Dry
Lime wash is unique in the world of decorating. It doesn’t just “dry” by losing water; it “cures” by gaining carbon dioxide. This process, known as carbonation, turns the calcium hydroxide (slaked lime) back into calcium carbonate (limestone) on your wall. It is literally turning back into stone.
This chemical reaction requires two things: CO2 from the air and—crucially—a specific amount of moisture. If a room is too hot and dry, the water evaporates before the CO2 can be absorbed, resulting in a dusty, chalky finish that rubs off (a defect called “dusting”). Conversely, if the room is too damp and cold, the water blocks the pores, and carbonation stalls. Lime paint specialists explain that the curing process of limewash will continue for approximately 12 months, though the critical hardening happens in the first few weeks.
For the UK specialist, this means the “goldilocks” zone of humidity is vital. You cannot force-dry lime wash with heaters. It needs a gentle, somewhat humid (but not wet) environment to carbonate slowly and strongly. This is why spraying a fine mist of water on exterior lime render is a common practice, and why interiors need careful monitoring.
Mastering lime is about managing the atmosphere as much as the application.
Why Modern Vinyl Wallpaper Causes Blown Plaster in Old Homes
In the quest for durability, many homeowners turn to “scrubbable” vinyl wallpapers or heavy-duty vinyl paints. In a modern build with cavity walls and vapour barriers, this is rarely an issue. However, in a solid-walled Victorian or Edwardian property, applying a non-permeable vinyl layer is equivalent to wrapping the house in cling film.
Old walls manage moisture by absorbing it and allowing it to evaporate. When you apply vinyl, you trap that moisture inside the plaster. As Natural Building Australia notes:
These paints can look traditional but behave more like plastic films, trapping moisture and undermining the health of the wall.
– Natural Building Australia, Vapour Permeability vs. Breathability in Clay & Lime Surfaces
Over time, this trapped interstitial condensation degrades the lime plaster, causing it to detach from the masonry—a phenomenon known as “blown plaster.” The wallpaper might look pristine, but the wall behind it is crumbling. In humid UK climates, the wall needs to breathe to the inside when the outside is saturated with rain. Vinyl blocks this path entirely.
Respecting the heritage of the building structure often means rejecting modern “convenience” finishes.
Key Takeaways
- Humidity slows down water evaporation, increasing the risk of blocking and tannin bleed.
- Natural binders like lime require moisture to carbonate, not just dry out.
- Scrubbing eco-paints too soon destroys the finish; allow at least 2 weeks for a full cure.
Plaster or Paint: Which Finish Allows Victorian Walls to Breathe?
We have established that trapping moisture is the enemy of longevity in humid climates. This leads to the ultimate question for heritage renovations: should we paint at all, or simply finish with a high-quality pigmented plaster? The goal is to maximize permeability, measured by the SD value (equivalent air layer thickness). The lower the SD value, the more breathable the finish.
Clay paints and lime washes offer extremely low SD values, making them nearly as breathable as the air itself. Leaving a clay plaster unpainted is the ultimate breathable option, but it lacks protection against dirt. A high-quality clay or silicate paint offers the best compromise: it provides colour and a sacrificial wear layer without compromising the wall’s ability to handle humidity.
Assess the humidity levels in your workspace today and adjust your curing schedule to protect your professional reputation.
Frequently Asked Questions about Managing application in humid climates
How long does eco-paint take to cure in winter?
While eco-paints may feel dry to the touch within a few hours, full curing (hardening) typically takes 7 to 30 days in humid winter conditions. Low temperatures and high humidity significantly slow down the evaporation of water and the oxidation of natural oils.
Can I use a dehumidifier to speed up drying?
Yes, but use it with caution. While a dehumidifier helps lower relative humidity, drying natural paints too fast (especially lime or clay) can cause surface cracking or “mud cracking.” It is better to aim for a steady 50-60% relative humidity rather than creating an arid environment.
Why is my paint stripping off when I wipe it?
This usually means the paint hasn’t fully cured yet. Natural binders remain soft and sensitive to abrasion and water for several weeks. Avoid scrubbing walls for at least 14 days after application to allow the film to harden completely.