A true luxury open-plan suite is an engineered system of comfort, not just an open space lacking walls.
- Effective moisture control relies on “invisible engineering,” including silent, high-capacity extraction and strategic make-up air.
- Sensory zoning using smart glass, acoustic insulation, and layered lighting preserves intimacy and serenity.
Recommendation: Prioritize integrated architectural solutions that design out problems over cosmetic fixes that merely disguise them.
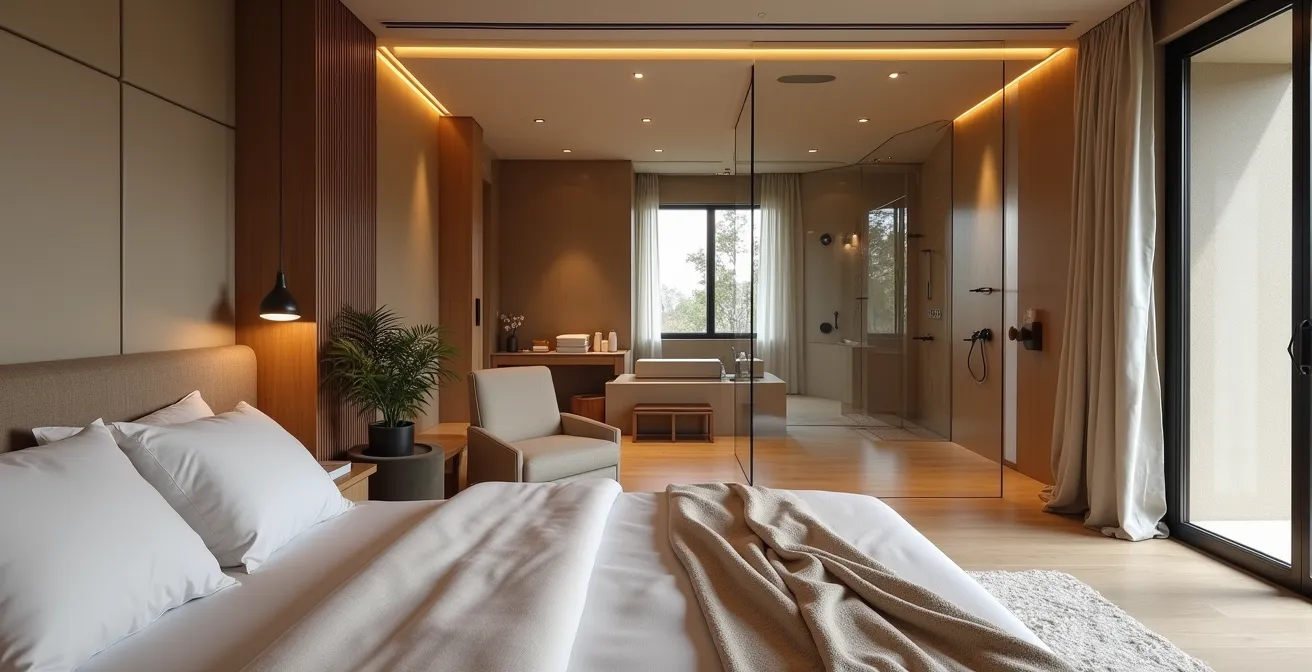
The allure of an open-plan master suite is undeniable. It evokes the seamless luxury of a boutique hotel, a space where the boundaries between rest and ritual dissolve. You envision waking up to natural light flooding a unified area, a spa-like en-suite flowing effortlessly from your sleeping quarters. For many couples, this represents the pinnacle of modern, sophisticated living. Yet, this romantic vision often clashes with a nagging, practical fear: the pervasive creep of dampness, the loss of privacy, and the unwelcome intrusion of noise.
The common advice—install a good extractor fan and use water-resistant paint—barely scratches the surface. These are reactive measures, not a holistic strategy. The reality is that moisture from a shower doesn’t politely stop at an imaginary line. It travels, settling into soft furnishings, creating a subtly damp feeling on bedding, and over time, causing paint to peel and materials to degrade. The sound of a flushing toilet or a running fan at 3 a.m. can instantly shatter the serene ambiance you worked so hard to create. But what if the solution wasn’t about constantly battling these issues, but about designing them out of existence from the very beginning?
The secret to a successful open-plan master suite lies in a concept of invisible engineering and sensory zoning. This approach balances the desire for openness with the practical need for control. It’s about creating a high-performance environment where airflow, acoustics, light, and privacy are managed through thoughtful, integrated architectural solutions. This guide moves beyond the obvious to give you the strategic blueprint for achieving that perfect, hotel-style sanctuary without compromise.
This article provides a detailed roadmap for navigating the specific challenges of an open-plan en-suite. We will explore the technical solutions and design strategies that turn a potential problem into a statement of luxury.
Summary: The Architect’s Guide to Flawless Open-Plan En-Suites
- Why Silent Extraction Fans Are Critical for Sleeping Zones
- How to Use Smart Glass for Instant Privacy in En-Suites
- Carpet vs Wood: How to Transition from Bedroom to Wet Area?
- The Soil Pipe Noise That Ruins the Serenity of the Room
- How to Hide the Walk-In Wardrobe Behind the Headboard
- How to Layer Lighting for a Relaxing Evening Ambience
- The Extractor Fan Error That Leads to Peeling Paint
- Applying Compact Design Principles to the Open-Plan Shower
Why Silent Extraction Fans Are Critical for Sleeping Zones
In a traditional, enclosed bathroom, the drone of an extractor fan is a minor, temporary annoyance. In an open-plan master suite, it becomes a direct assault on the primary purpose of the space: rest. The key to effective ventilation in a sleeping zone is not just power, but silence. This is where understanding acoustic measurements becomes crucial. Fan noise is measured in “sones,” and for a bedroom environment, the target should be 1.0 sones or less. For context, 1.0 sones is comparable to the gentle hum of a modern refrigerator, while a standard fan can easily reach 3.0 or 4.0 sones, which is loud enough to disrupt sleep.
Achieving this level of quiet performance requires selecting a high-quality centrifugal fan, often mounted remotely in an attic or ceiling cavity, connected by insulated ducting. This isolates the motor noise from the living space. Furthermore, the system must be powerful enough to handle the increased air volume of the combined bedroom and bathroom. Undersizing is a common and critical mistake. To combat this, modern systems utilize automated humidity sensors. A wall-mounted sensor provides the best overall reading of the room’s ambient humidity, automatically activating the fan when a threshold is crossed—such as during a shower—and running it until the moisture level returns to normal. This “invisible engineering” ensures the space is protected without requiring any manual intervention or enduring unnecessary noise.
Action Plan: Calculating Your Fan’s Required Power (CFM)
- Calculate the total volume of the bathroom (Length x Width x Height).
- Add the volume of the bedroom area to get the total combined room volume for an accurate assessment.
- Apply the formula: For every square foot of floor space, you need 1 CFM (Cubic Feet per Minute) of fan power, with a baseline minimum of 50 CFM.
- For an open-plan layout, add an extra 50 CFM for each shower or bathtub, and 100 CFM for a jetted tub, to handle the concentrated moisture sources.
- Factor in ducting: If you cannot calculate exact pressure loss from duct runs, select a fan rated for 0.4 inches of static pressure (Pst) to ensure it performs effectively.
How to Use Smart Glass for Instant Privacy in En-Suites
The dream of an open-plan en-suite often confronts the very real, non-negotiable need for privacy. How do you maintain that bright, airy connection while creating a sense of personal sanctuary on demand? The most elegant and technologically advanced solution is switchable smart glass. This technology allows a glass panel to change from transparent to opaque with the flick of a switch, offering the best of both worlds: complete openness when desired and total privacy when needed. It’s the ultimate expression of luxury and control, perfectly aligning with the “invisible engineering” ethos.
While smart glass is the premium choice, it represents a significant investment. Fortunately, there are other sophisticated ways to use glass for both privacy and moisture control. A large, fixed panel of etched or frosted glass can create a permanent visual screen around the shower or toilet area. This maintains the flow of light throughout the space while artfully obscuring certain zones. The key is strategic placement. An ample walk-in shower enclosed by floor-to-ceiling glass, for instance, not only feels luxurious but also effectively contains the majority of steam and splashes, protecting the rest of the room. This transforms the glass from a simple divider into a functional part of the room’s moisture management system.
| Solution Type | Privacy Level | Installation | Cost Range |
|---|---|---|---|
| Smart Glass Panels | Opaque to Clear on demand | Professional required | High investment |
| Etched Glass Dividers | Permanent semi-opaque | Professional required | Medium investment |
| Sliding Screens | Adjustable privacy | Moderate DIY possible | Low-medium investment |
Carpet vs Wood: How to Transition from Bedroom to Wet Area?
The transition from the soft, warm bedroom floor to the hard, practical surface of the bathroom is a critical detail in both aesthetics and function. While a continuous hard floor like sealed wood or luxury vinyl tile is the simplest solution, many still desire the plush comfort of carpet in the sleeping area. This creates a technical challenge: how to create a 100% waterproof barrier at the threshold to prevent water from wicking into the carpet and its underlay, leading to mould and odours.
The solution lies beneath the surface. A waterproof tanking membrane, identical to that used to line the wet room floor, must be installed. This membrane should extend from the wet area, run underneath the transition strip, and continue for at least six inches into the dry bedroom area. This creates an invisible, impermeable dam. The transition strip itself must be carefully chosen to accommodate the height difference between the tile and the carpet, creating a crisp, clean line. Furthermore, the bathroom floor itself requires a subtle but crucial slope. A floor gradient of between 1:50 to 1:80 ensures that all water is directed towards the drain and away from the threshold.
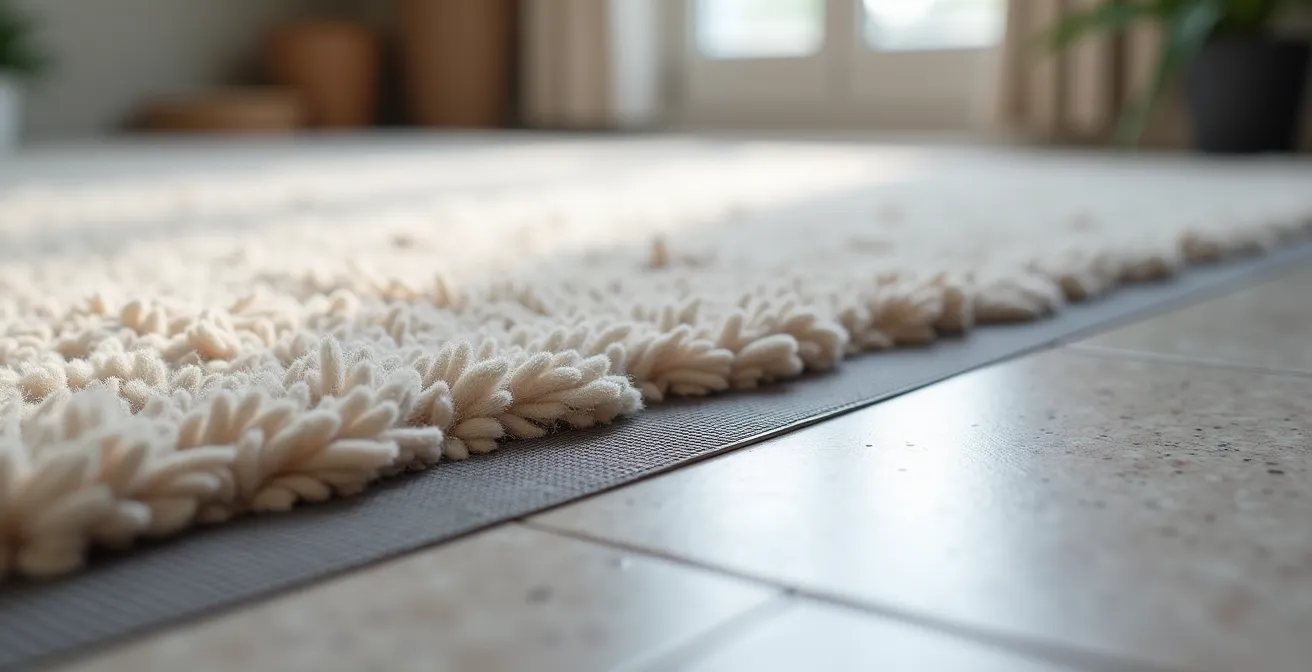
As the image above illustrates, the success of this junction depends on technical precision. The textural contrast between the soft carpet and the hard tile becomes a beautiful design feature, but only when underpinned by this robust waterproofing strategy. This is a perfect example of performance aesthetics, where the technical solution enables the desired look and feel.
The Soil Pipe Noise That Ruins the Serenity of the Room
Few things can shatter the tranquility of a luxury suite faster than the sudden, gurgling rush of a soil pipe after a toilet flush. In a conventional home, this noise is often masked by walls and distance. In an open-plan design, the soil pipe can become an unwelcome acoustic feature, especially if it runs along the shared wall between the bedroom and bathroom. The location of the toilet is therefore a primary strategic decision; whenever possible, avoid placing it against the wall you sleep next to. This simple architectural choice can prevent a major source of nightly disturbance.
When rerouting isn’t an option, the focus must shift to acoustic insulation. Standard thermal insulation is insufficient. You need materials specifically designed to block structure-borne noise and vibrations. Boxing in the pipework with dense acoustic plasterboard and wrapping the pipe itself in a specialist material is the most effective approach. These materials work by adding mass and decoupling the pipe from the building’s structure. For new builds or major renovations, specifying cast iron soil pipes instead of modern plastic (PVC) is a superior, albeit more expensive, solution. The inherent mass of cast iron naturally dampens sound far more effectively.
| Material Type | Noise Reduction | Best For | Installation Complexity |
|---|---|---|---|
| Mineral Wool | Good for airborne noise | General insulation | Simple DIY |
| Mass-Loaded Vinyl (MLV) | Excellent for low-frequency vibrations | Structure-borne noise | Moderate complexity |
| Resilient Channels | Decouples pipe from structure | Professional grade solution | Professional required |
| Cast Iron Pipes | Inherently quiet due to mass | New construction/full renovation | Professional required |
How to Hide the Walk-In Wardrobe Behind the Headboard
One of the most elegant architectural solutions for an open-plan master suite is the creation of a “hidden” walk-in wardrobe behind a full-width headboard wall. This piece of integrated architecture acts as a brilliant multi-tasker. It serves as a sophisticated backdrop for the bed, a physical and acoustic barrier to the en-suite, and a discreet entrance to the dressing area. This design cleanly separates the “rest” zone from the “prepare” zone without closing off the room, maintaining the expansive, open feel.
The key to making this work is to treat the headboard wall as a substantial piece of construction, not just a decorative feature. It should be packed with high-performance acoustic insulation to buffer any sound from the wardrobe or the bathroom beyond. Ventilation is also critical to prevent clothes from becoming musty. This can be achieved through:
- Installing discreet ventilation grilles at the top and bottom of the wardrobe to encourage natural air convection.
- Connecting a small inline fan within the wardrobe to the main bathroom extraction system for active air movement.
- Integrating motion-sensor LED strip lighting, which adds a touch of luxury and practicality.
This approach also provides an opportunity to build in functional details like recessed charging stations and integrated reading lights into the headboard itself, further decluttering the space.
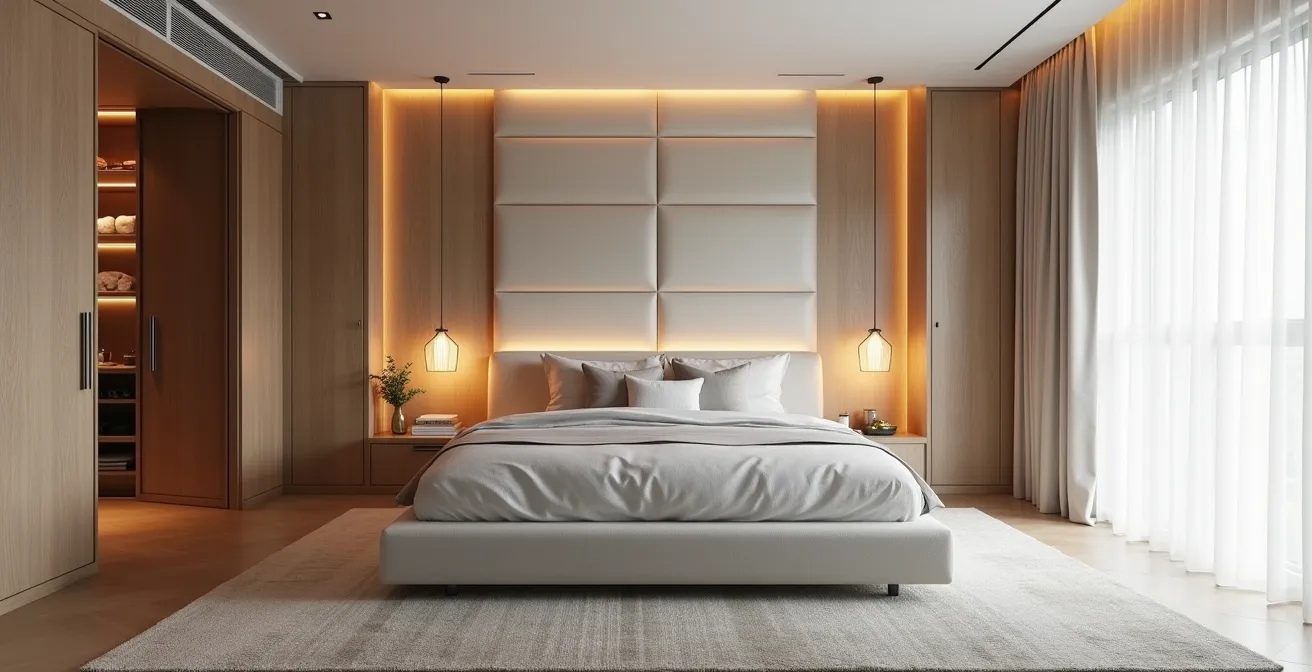
As shown, this solution is the epitome of clean, minimalist design where function is beautifully concealed. The headboard wall becomes the central organizing element of the entire master suite, defining zones without the need for traditional walls and doors.
How to Layer Lighting for a Relaxing Evening Ambience
In an open-plan suite, lighting does more than just illuminate; it zones the space, sets the mood, and supports our natural body clock. A single, harsh overhead light is the enemy of relaxation. Instead, a layered lighting scheme is essential for creating a “sensory zone” that can transition from bright and functional to soft and intimate. This involves combining four distinct types of lighting, each with its own purpose and colour temperature. This approach helps achieve a state of “circadian harmony,” signalling to the body when it’s time to be alert and when it’s time to wind down.
Safety is also paramount. All electrical equipment used in a bathroom is categorized into zones, and any light fittings must have the appropriate IP (Ingress Protection) rating. For example, standards specify that IPX4-rated equipment is required for Zone 1, which is the area directly above a bath or within a shower enclosure up to a height of 2.25m. This is a non-negotiable safety requirement. Your lighting plan must be both beautiful and compliant. By using dimmers on all circuits, you gain ultimate control, allowing you to tailor the ambiance perfectly for a bright morning routine or a tranquil evening soak.
| Lighting Type | Purpose | Color Temperature | Best Placement |
|---|---|---|---|
| Task Lighting | Vanity/grooming activities | 4000K (clear white) | Around mirrors |
| Ambient Lighting | Overall soft illumination | 3000K (warm white) | Ceiling/walls |
| Accent Lighting | Feature highlighting | 2700K (warm) | Architectural features |
| Evening/Night | Circadian-friendly | 2200K (very warm) | Low-level placement |
The Extractor Fan Error That Leads to Peeling Paint
You’ve invested in a powerful, silent extractor fan. Yet, you still find condensation on the windows and, eventually, peeling paint. The most common culprit is an issue that is almost universally overlooked: the lack of “make-up air.” An extractor fan works by creating negative pressure, pulling moist air out of the room. But for it to work effectively, an equal amount of dry, fresh air must be able to enter the room to replace what’s been removed. If the room is too perfectly sealed (a common goal in modern, energy-efficient homes), the fan struggles, churns the air, and cannot extract moisture efficiently. The fan motor works harder, becomes noisier, and fails to do its job.
The solution is surprisingly simple and low-tech. The bathroom door—or the main door to the master suite—should be undercut by at least three-quarters of an inch to create a gap over the finished floor. This small, unnoticeable gap provides a clear, easy path for make-up air to be drawn into the space, allowing the extraction system to function at peak performance. This single detail can be the difference between a dry, healthy room and one that suffers from chronic condensation and its damaging effects.
Other common installation errors can also sabotage your ventilation system:
- Run-on timer set too short: The fan should continue to run for 15-30 minutes after a shower to clear all residual humidity.
- Sagging flexible ducting: Flexible ducts can dip, creating low points where water condenses and pools, blocking airflow and breeding mould. Rigid, insulated ducting is always the superior choice.
- Wrong fan type for the job: Axial fans are for short, straight duct runs through an external wall. Centrifugal fans are necessary to push air through longer, more complex duct systems.
- Undersized fan: As discussed, a fan must be sized for the total volume of the open-plan space, not just the bathroom footprint.
Key Takeaways
- True luxury is achieved through “invisible engineering” that designs out moisture, noise, and privacy issues from the start.
- A silent (under 1.0 sones) and powerful (correctly calculated CFM) extraction system with make-up air is non-negotiable.
- Layered solutions are key: use integrated architecture, smart materials, acoustic insulation, and layered lighting to create distinct sensory zones without walls.
Applying Compact Design Principles to the Open-Plan Shower
While open-plan suites feel expansive, the principles that make small bathrooms work are directly applicable to managing the wettest part of the room: the walk-in shower. In a compact bathroom, every inch is scrutinized for performance, a lesson we must apply here. The biggest challenge with any open, curb-less shower is effectively managing both splashed water and steam. Steam, in particular, will not be confined by a single glass panel and will readily migrate into the bedroom area.
To combat this, a robust, continuous extraction system becomes even more vital. In colder climates or particularly large spaces, ventilation specialists often recommend a low-level, continuous exhaust of up to 20 CFM in addition to the powerful boost-mode fan. This constant, gentle airflow prevents humidity from building up in the first place. Furthermore, the design of the shower floor is critical. A truly open, curb-less shower requires significantly more floor space dedicated to drainage, often necessitating a long trough drain to capture water effectively and prevent it from migrating across the bathroom floor. This is why a semi-enclosed walk-in shower, using large glass panels, often provides the best balance of an open feel with practical moisture containment.
Ultimately, a successful open-plan master suite is a system where every component works in harmony. The ventilation removes moisture, the floor directs water, the glass contains splashes, and the acoustic insulation preserves peace. It is the sum of these carefully considered parts that creates a space that is not only beautiful but also functions flawlessly for years to come.
By applying these integrated principles of invisible engineering and sensory zoning, you can move beyond simple interior design and begin crafting a master suite that delivers true, uncompromised luxury. Your journey to a perfectly balanced sanctuary starts with a detailed, architectural plan.