Successfully converting a 1930s semi to open-plan is less about interior design and more about a non-negotiable engineering project balancing structure, fire safety, and thermal efficiency.
- Removing a load-bearing wall requires a structural engineer, Building Control approval, and often Party Wall agreements, adding significant cost and complexity.
- Larger, open spaces are harder and more expensive to heat; solving this requires specific measures like zoned heating and draught-proofing, not just better radiators.
Recommendation: Before engaging an architect for full plans, invest in a structural engineer’s feasibility report. This confirms what’s possible and prevents wasting thousands on unviable designs.
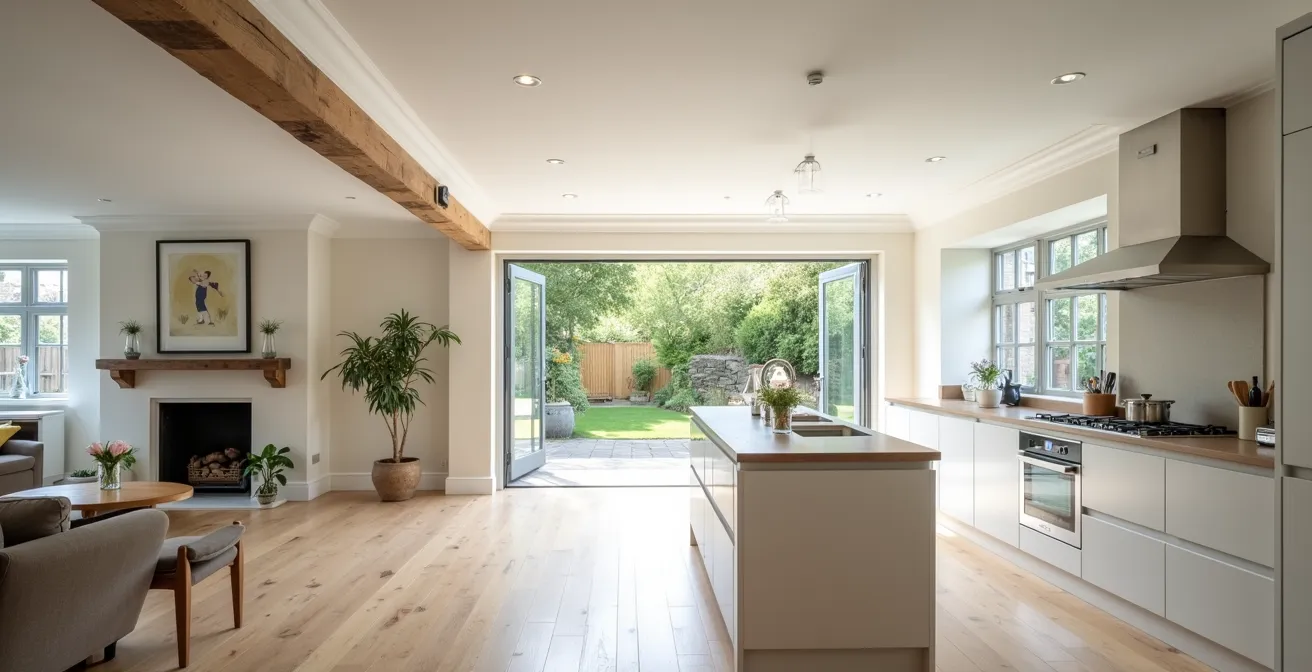
The allure of open-plan living is powerful. You picture a light-filled, sociable space where kitchen, dining, and living areas merge seamlessly. For families in the UK’s ubiquitous 1930s semi-detached houses, knocking down the wall between a narrow kitchen and a formal dining room seems like the perfect way to create a modern family hub. It’s a vision sold in every property magazine and TV renovation show.
Most advice focuses on the aesthetic benefits: the sense of space, the improved flow, the connection to the garden. While these are valid, they often glide over the harsh realities of imposing a 21st-century layout onto early 20th-century construction. The common narrative suggests you just need to check if a wall is load-bearing and hire a builder. But what if the real challenge isn’t the wall itself, but the trinity of constraints it unleashes: structural integrity, thermal performance, and fire safety?
This guide moves beyond the “wow factor”. As a residential architect specialising in period properties, I’ll walk you through the critical technical considerations. The key to a successful project isn’t just choosing the right kitchen island; it’s understanding that this is an engineering project first and a design project second. We will explore the hidden costs, the regulatory hurdles, and the strategic decisions that determine whether your open-plan dream becomes a comfortable reality or a costly, compromised space.
This article provides an architect’s insight into the crucial questions you must answer before starting work. We will break down the process, from managing heating costs to navigating the complexities of Building Regulations, ensuring you are fully equipped to make an informed decision.
Summary: Navigating Your 1930s Semi Open-Plan Conversion
- Why Open Plan Kitchens Increase Heating Bills by Up to 20%
- How to Remove a Load-Bearing Wall According to Building Regulations
- Broken Plan vs Open Plan: Which Suits Family Life Better?
- The Fire Safety Regulation Most Homeowners Overlook
- When to Hire a Structural Engineer: Before or After the Architect?
- Hidden Beam vs Box Frame: Which Maximizes Ceiling Height?
- Hip-to-Gable vs Dormer: Which Maximizes Walkable Floor Area?
- Removing Load-Bearing Walls: Costs and Regulations in the UK
Why Open Plan Kitchens Increase Heating Bills by Up to 20%
The most immediate and often underestimated consequence of creating a large open-plan space is the impact on your heating. A 1930s semi was designed with a cellular room layout, where each small space could be heated efficiently and independently. By removing internal walls, you create a single, larger air volume that is fundamentally harder to heat. Heat from the kitchen now dissipates into the living area, and draughts from original features like bay windows have a much larger space to cool down. This isn’t a minor issue; it can lead to a significant rise in energy consumption, especially with household energy bills already being 43% above winter 2021/22 levels according to the House of Commons Library.
The key to mitigating this is to think about the house’s thermal envelope as a whole system. Simply installing larger radiators is an inefficient and costly sticking plaster. A successful strategy involves a combination of reducing heat loss and improving heating control. For instance, many 1930s homes have suspended timber floors, which can account for up to 15% of a home’s heat loss if uninsulated. Addressing this, along with professionally draught-proofing original windows and doors, is the first step.
The second part of the solution is smarter heating. A single thermostat in the hallway is no longer effective for a large, multi-use space. A 1930s house renovation featured on Homebuilding & Renovating successfully managed this by installing zoned underfloor heating (UFH). This allows the kitchen area to be warmer in the morning while the living area is cooler, and vice-versa in the evening. Combined with smart thermostats, this level of control can prevent the huge temperature fluctuations and energy waste typical of poorly-planned open spaces, ultimately making the new layout comfortable and affordable to run.
How to Remove a Load-Bearing Wall According to Building Regulations
Physically removing the wall is the most symbolic moment of any open-plan project. If the wall is load-bearing—and in a 1930s semi, the central spine wall almost always is—it’s a serious structural intervention governed by Part A (Structure) of the UK Building Regulations. This is not a task for a general builder alone; it legally requires the input of a qualified structural engineer. Their job is to calculate the precise size and specification of the steel beam (often an RSJ – Rolled Steel Joist) needed to carry the load of the wall, floor joists, and any walls on the floor above.
The process for gaining approval is systematic. The engineer’s calculations and drawings must be submitted to your local authority’s Building Control department (or a private Approved Inspector). For this type of work, you can use a Building Notice for simpler jobs or a Full Plans application for more complex ones. The key difference is that a Full Plans application is checked and approved *before* work starts, giving you certainty. In either case, a Building Control Officer will need to inspect the work at critical stages, primarily to see the foundations for the new beam (the padstones) and the steel beam itself once it’s in place but before it’s covered up.
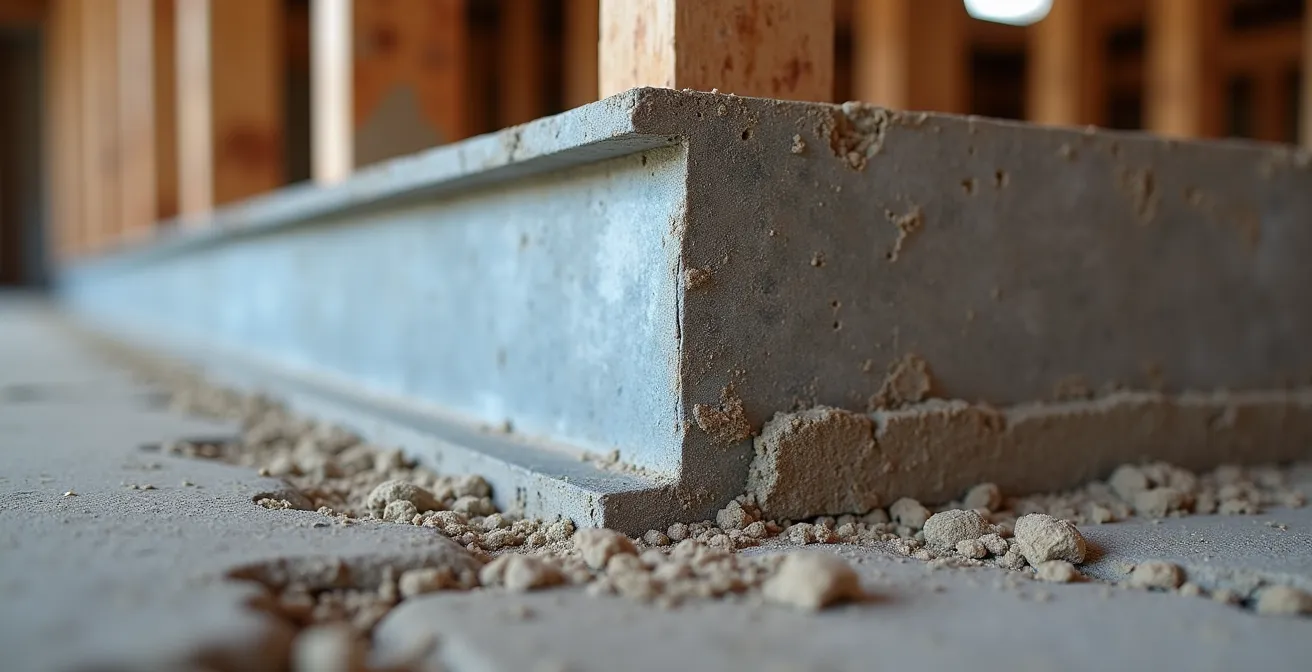
As the image shows, the connection between the steel beam and the supporting padstone is a critical detail. This is what the inspector will be checking to ensure the load is safely transferred. Once the work is completed and signed off, you will receive a Building Control Completion Certificate. This document is vital. Without it, you will face significant problems when you come to sell your property, as it’s the legal proof that the structural alteration was done safely and correctly. The structural engineer’s fees for these calculations are a necessary investment, with typical costs for a straightforward wall removal ranging from £300 to £700.
Broken Plan vs Open Plan: Which Suits Family Life Better?
While full open-plan living is often seen as the ultimate goal, it’s not always the best fit for the practicalities of family life. The main drawbacks are the lack of acoustic separation and the constant visibility of mess. The sound of the washing machine, the TV, and a conversation can merge into an unpleasant ‘sound soup‘. This has led to the rise of ‘broken-plan’ design, a more nuanced approach that maintains the visual connection and sense of light of open-plan while offering the ability to separate zones when needed.
Broken-plan uses clever design devices to delineate space without solid walls. This can include using different floor finishes, creating split levels, or installing features like internal glazed screens, pocket doors, or even strategically placed furniture and shelving units. For a family with young children, full open-plan might be ideal for constant supervision. However, as children grow into teenagers needing quiet spaces for homework, the ability to close a door to a study area or TV snug becomes invaluable. Broken-plan offers this flexibility.
The choice between the two layouts depends heavily on your family’s lifestyle and life stage. The following table provides a clear comparison of the key differences:
| Feature | Open Plan | Broken Plan |
|---|---|---|
| Noise Control | Sound travels freely – TV, kitchen appliances create ‘sound soup’ | Pocket doors & glass partitions contain sound effectively |
| Visual Connection | Complete visibility across all zones | Maintained sightlines with option to close off areas |
| Best Life Stage | Young children (constant supervision needed) | Teenagers (quiet study zones, privacy) |
| Kitchen Mess | Always visible from living areas | Can be concealed when needed |
| Heating Efficiency | Larger space to heat, higher costs | Zone heating possible, better control |
Ultimately, broken-plan is not a compromise but a sophisticated evolution of open-plan living. It acknowledges that while we love the feeling of space, we also crave pockets of privacy and quiet. For a 1930s semi, where space is at a premium, this flexible approach can often deliver a more practical and liveable long-term solution.
The Fire Safety Regulation Most Homeowners Overlook
When you remove the walls on the ground floor that previously enclosed the staircase, you fundamentally alter the fire escape route from the upstairs bedrooms. A traditional hallway and staircase provide a ‘protected route’ to the front door, enclosed by walls and doors that offer 30 minutes of fire resistance. An open-plan layout removes this protection, creating a direct path for fire and smoke from a ground-floor kitchen to the first-floor landing. This is a major concern for Building Control, and it is governed by Part B (Fire Safety) of the Building Regulations.
Simply installing standard smoke alarms is not enough to satisfy the regulations. You must introduce ‘compensatory measures‘ to make the new layout safe. There are typically two main routes to compliance. The first, and most common, is to install a domestic sprinkler or water misting system across the entire open-plan area. This actively suppresses a fire, protecting the escape route. The cost of installing a domestic sprinkler or misting system costs between £2,000 and £4,000, a significant but often non-negotiable budget item.
The alternative to a sprinkler system involves creating a new protected lobby. This means building new partitions and a fire door (rated FD30) around the base of the stairs to separate it from the high-risk kitchen area. While sometimes cheaper in materials, this can compromise the open-plan aesthetic you were trying to achieve. Regardless of the chosen path, you will also be required to upgrade your alarm system to interlinked, mains-powered smoke and heat alarms. These are the crucial safety measures that ensure your open-plan dream doesn’t become a regulatory nightmare.
- Install a domestic sprinkler or water misting system throughout the ground-floor open-plan area.
- Alternatively, create a protected lobby at the base of the stairs with FD30 fire doors.
- Fit interlinked, mains-powered smoke alarms in all circulation spaces (hall, landing).
- Add a heat alarm in the kitchen area, linked to the main alarm system.
When to Hire a Structural Engineer: Before or After the Architect?
One of the most common and costly mistakes homeowners make is in the phasing of professional appointments. Many families, excited by the design possibilities, will hire an architect or architectural designer first. They spend weeks, and often hundreds or even thousands of pounds, developing a beautiful set of drawings for their dream open-plan layout, only to then show them to a structural engineer who declares the plan structurally unfeasible or prohibitively expensive. The correct approach follows a clear strategic order: concept first, then engineering feasibility, then detailed design.
The optimal sequence saves time, money, and disappointment. You should start with an initial consultation with an architect or designer to define your desired layout and what you want to achieve. But before committing to full detailed drawings, you should engage a structural engineer. For a relatively small fee, they can conduct a feasibility assessment. They will visit the property, determine which walls are load-bearing, and provide a report on what is possible and a rough order of cost for the structural elements. This ‘professional phasing’ ensures you don’t waste money designing something that can’t be built.
Case Study: The Smart Approach to Wall Removal
A homeowner looking to remove a 3-metre load-bearing wall between their kitchen and dining room followed an optimal phased approach. An initial architect consultation (£500) defined the desired layout. They then hired a structural engineer for a feasibility report and initial calculations (£320) *before* commissioning detailed architectural drawings. The engineer confirmed the plan was viable and provided the necessary beam design for Building Control. This prevented wasted architectural fees on a potentially flawed concept, bringing total professional fees to £820, versus a potential £1,500+ if full plans had been drawn up first.
Once the structural approach is confirmed as viable and affordable, you can then proceed with confidence, commissioning the architect to produce the detailed drawings for planning (if needed) and Building Regulations, knowing the core of the project is sound. To ensure you hire the right professional, it’s crucial to ask the right questions.
Your checklist for hiring a structural engineer:
- Credentials Check: Are you a Chartered Engineer (MIStructE or CEng) and do you carry professional indemnity insurance?
- Experience Audit: Have you worked on 1930s semi-detached properties before and are you familiar with their common structural issues?
- Scope of Work: Does your fee include site visits, calculations for Building Control, detailed drawings, and any necessary revisions?
- Process Clarification: Will you liaise directly with our local Building Control department on our behalf?
- Deliverables Confirmation: Can you provide examples of the calculation packs and drawings you produce?
Hidden Beam vs Box Frame: Which Maximizes Ceiling Height?
Once you and your engineer have determined the need for a steel beam, a key aesthetic and financial decision arises: should the beam be visible or hidden? The standard and most cost-effective method is to create a ‘downstand’ or ‘box frame’, where the beam is installed below the ceiling joists. It is then typically boxed in with plasterboard and painted to match the ceiling. This creates a visible bulkhead running across the new opening, which can be a useful visual cue to delineate the kitchen zone from the living zone.
However, for those seeking a completely seamless, uninterrupted ceiling, the goal is a ‘flush’ or ‘hidden’ beam. This is a far more complex and expensive installation. It involves cutting back the existing ceiling joists, propping the floor above, and fitting the new steel beam in-line with the joists, which are then hung from the new beam using metal hangers. This process is more labour-intensive, requires intricate carpentry, and can be 30-50% more expensive than a standard downstand beam. The reward, however, is a perfectly flat ceiling that maximises the sense of height and space.
The choice between these two options is a trade-off between budget, time, and your desired aesthetic outcome. The table below outlines the main considerations:
| Aspect | Hidden/Flush Beam | Box Frame/Downstand |
|---|---|---|
| Ceiling Appearance | Completely flat, uninterrupted | Visible beam below ceiling level |
| Installation Complexity | Requires floor propping, intricate carpentry | Simpler installation process |
| Cost Impact | 30-50% more expensive | Standard pricing |
| Installation Time | 3-5 days typical | 1-2 days typical |
| Design Potential | Maximizes height perception | Can zone spaces, hide services |
| Structural Work | Temporary propping essential | Minimal temporary support |
While a hidden beam offers a cleaner look, a well-designed downstand can be an intentional design feature, sometimes used to house recessed lighting or extractor ducting. Your decision should be based on a clear understanding of the significant cost and complexity a hidden beam adds to the project.
Hip-to-Gable vs Dormer: Which Maximizes Walkable Floor Area?
Creating a large, open-plan family space on the ground floor often has a knock-on effect on the rest of the house. You might lose a separate dining room or snug, creating a need to reclaim private, enclosed space elsewhere. For many 1930s semis, the answer lies in the loft. A loft conversion can provide the extra bedroom, office, or playroom that was sacrificed downstairs. When considering a loft conversion on a semi-detached house with a ‘hipped’ roof (a roof that slopes on all sides), the two main options are a dormer conversion or a more extensive hip-to-gable conversion.
A dormer involves building a box-like structure out from the rear roof slope, creating valuable headroom. A hip-to-gable conversion is more radical: it involves replacing the sloping side ‘hip’ with a vertical brick wall (a ‘gable’), effectively extending the main ridge of the roof to create a much larger, more rectangular internal space. This approach typically delivers significantly more usable, walkable floor area with full-height headroom compared to a dormer.
A case study of a 1930s property renovation on Homebuilding & Renovating shows how this holistic approach works. The family combined a ground-floor open-plan conversion with a hip-to-gable loft extension. This strategy allowed them to create two full-sized bedrooms and a bathroom in the loft, maximising the rectangular footprint. However, because this type of conversion alters the structure of the shared roof and wall, it almost always requires a Party Wall Agreement with your adjoining neighbour. This is a legal process that must be started at least two months before work begins and can add significant professional fees, as Party Wall Act compliance can cost £1,000-£2,000 per surveyor if disputes arise.
Key Takeaways
- An open-plan conversion is an engineering project governed by Building Regulations for structure (Part A) and fire safety (Part B).
- Factor in “hidden” costs: engineer fees, Building Control applications, Party Wall agreements, and essential fire safety measures like sprinkler systems.
- Mitigating higher heating costs is crucial. Plan for insulation upgrades and zoned heating systems from the outset.
Removing Load-Bearing Walls: Costs and Regulations in the UK
Embarking on an open-plan conversion is a significant undertaking, and a clear understanding of the total project cost and regulatory landscape is essential for a smooth process. The costs go far beyond simply knocking down a wall and inserting a beam. You must budget for a cascade of associated expenses, from professional fees to the necessary compliance measures we’ve discussed. While every project is unique, a realistic budget is the foundation of a successful renovation.
In the UK, particularly in areas like London, the total project cost for a straightforward load-bearing wall removal is substantial. Including the builder’s labour, materials, steel beam, waste disposal, structural engineer’s fees, Building Control fees, and making good (plastering, electrics, flooring), full project costs in London typically range from £3,000 to £7,000 for a single wall. This figure does not include a new kitchen, decoration, or the potentially significant cost of fire safety systems or Party Wall surveyors, which could add several thousand pounds more.
Navigating the regulatory requirements is just as important as managing the budget. Failure to comply can invalidate your home insurance and create major issues when selling the property. A clear checklist is the best way to ensure you have all your legal and regulatory obligations covered before, during, and after the construction work.
- Structural Safety (Part A): Obtain formal Building Regulations approval for the structural design, supported by an engineer’s calculations.
- Fire Safety (Part B): Ensure your design includes compliant compensatory measures for the open-plan escape route, signed off by Building Control.
- Party Wall Act 1996: If you are in a semi-detached or terraced house, you must serve a formal notice to your neighbour(s) two months before work begins.
- Home Insurance: Inform your insurance provider before work starts to ensure your policy remains valid during construction, and update them upon completion.
- Documentation: Securely file all essential paperwork: the structural engineer’s report, the Party Wall agreement, and, most importantly, the Building Control Completion Certificate.
By approaching your open-plan conversion with this level of diligence—treating it as a coordinated engineering project—you move from hopeful homeowner to empowered project manager. To take the next step, begin by seeking a structural engineer’s feasibility report to get a clear, expert opinion on what’s truly possible in your home.