In summary:
- An uninsulated roof is responsible for a quarter of your home’s heat loss, making rooms cold and bills unnecessarily high.
- Correct installation requires a depth of at least 270mm while maintaining crucial airflow at the eaves to prevent damp.
- Compressing insulation under storage boards drastically reduces its effectiveness; use raised flooring solutions instead.
- Many UK households can get insulation installed for free or at a low cost through government-backed initiatives like the Great British Insulation Scheme.
There’s a familiar frustration for many UK homeowners: the heating is on, the radiators are hot, but the upstairs rooms remain stubbornly cold. You find yourself reaching for an extra blanket at night and dreading the arrival of the next energy bill. You’ve probably heard the well-known statistic that a home loses a significant amount of heat through its roof, and that adding insulation is the obvious answer. While this is fundamentally true, viewing it as a simple weekend DIY job of rolling out some material misses the bigger picture.
The real key to a warm, efficient home lies in understanding loft insulation as a technical system governed by building physics. Getting it wrong can lead to wasted money, persistent damp issues, and in worst-case scenarios, structural damage to your roof timbers. As an energy efficiency advisor, my goal is to move beyond the basics. This guide focuses not just on the ‘how-to’, but on the critical ‘why’—helping you avoid the common, costly mistakes many homeowners make and understand how insulation fits into your home’s entire energy ecosystem.
We’ll start by diagnosing the problem of cold upstairs rooms, then cover the correct techniques for installation. We’ll compare different materials, especially for older properties, before highlighting the biggest mistakes to avoid. Finally, we’ll look at the financial side, including how to access grants, and explore how proper insulation is the essential first step before considering modern heating technologies like heat pumps.
Summary: A Homeowner’s Guide to Effective Loft Insulation
- Why Your Upstairs Rooms Are Freezing Despite the Heating Being On
- How to Lay Mineral Wool Insulation Without Blocking Airflow
- Sheep’s Wool vs PIR Board: Which Is Best for Period Roofs?
- The Mistake of Squashing Insulation Under Boarding
- How to Check Your Eligibility for the Great British Insulation Scheme
- Why Internal Insulation Can Cause Rot in Joist Ends
- Why Heat Pumps Fail to Warm Houses with Microbore Pipework
- Air Source Heat Pumps: Are They Viable for Older UK Properties?
Why Your Upstairs Rooms Are Freezing Despite the Heating Being On
If your upstairs feels significantly colder than downstairs, the primary culprit is almost certainly heat escaping through your roof. Heat naturally rises through a process called convection, and if your loft isn’t properly insulated, it acts like a giant, unlidded container, letting all that expensive warmth dissipate into the cold air. For a typical uninsulated UK home, it’s a stark figure; according to the Energy Saving Trust, around 25% of all heat loss occurs through the roof. This constant leakage means your heating system has to work overtime just to maintain a baseline temperature, leading to inflated bills and inconsistent comfort.
The problem is often compounded by drafts and cold spots you can’t see. Small gaps in old or non-existent insulation, uninsulated loft hatches, and poor sealing around pipes create channels for cold air to be drawn into your living space, while warm air escapes. Before embarking on an insulation project, a thorough diagnosis is essential to understand exactly where your home is losing heat. This allows you to target the problem areas effectively rather than just applying a generic solution. A systematic check can reveal issues you weren’t aware of, ensuring your investment in insulation delivers the maximum return in both comfort and cost savings.
Your Action Plan: Diagnosing Heat Loss in Your Loft
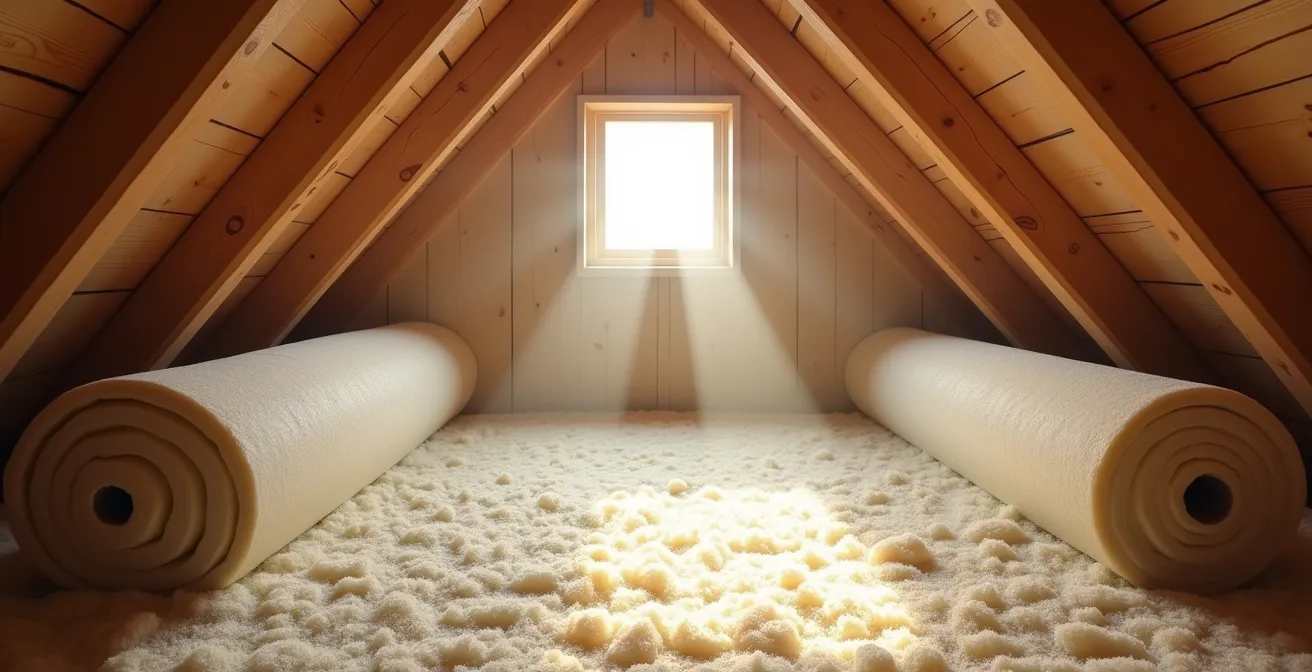
- Measure Existing Depth: Carefully measure your current insulation. For optimal performance in the UK, the total depth should be at least 270mm.
- Hunt for Gaps: Using a bright torch and a small mirror, check for gaps around joists, rafters, and where the roof meets the walls. These are common points of thermal bridging.
- Identify Cold Spots: For a more technical approach, a smartphone thermal camera attachment can visually pinpoint cold spots and hidden air leaks with surprising accuracy.
- Inspect the Loft Hatch: Feel for drafts around the edges of your loft hatch. Ensure it has insulation attached to its back and a tight-fitting compression seal around the frame.
- Document and Photograph: Take photos of problem areas. This provides a clear record to work from and helps demonstrate the improvements made afterwards.
How to Lay Mineral Wool Insulation Without Blocking Airflow
Once you’ve diagnosed the heat loss, the next step is installation. Mineral wool (which includes glass and rock wool) is the most common DIY choice due to its cost-effectiveness and ease of handling. The standard method involves laying a first layer of 100mm insulation between the joists, followed by a second 170mm layer laid at a right angle, covering the joists and preventing thermal bridging. While seemingly straightforward, one critical mistake can undermine the entire project: blocking ventilation.
Your loft needs to ‘breathe’. A constant, gentle flow of air, particularly at the eaves (where the roof meets the walls), is essential to carry away moisture-laden air that rises from the house below. If you push insulation right into the eaves, you block this airflow. Trapped moisture will condense on the cold underside of the roof felt and timbers, leading to damp, mould, and eventually, the rot of your roof structure. To prevent this, you must always leave a clear air gap. The best practice is to install eaves ventilation baffles or trays, which create a permanent tunnel for air to flow above the insulation.
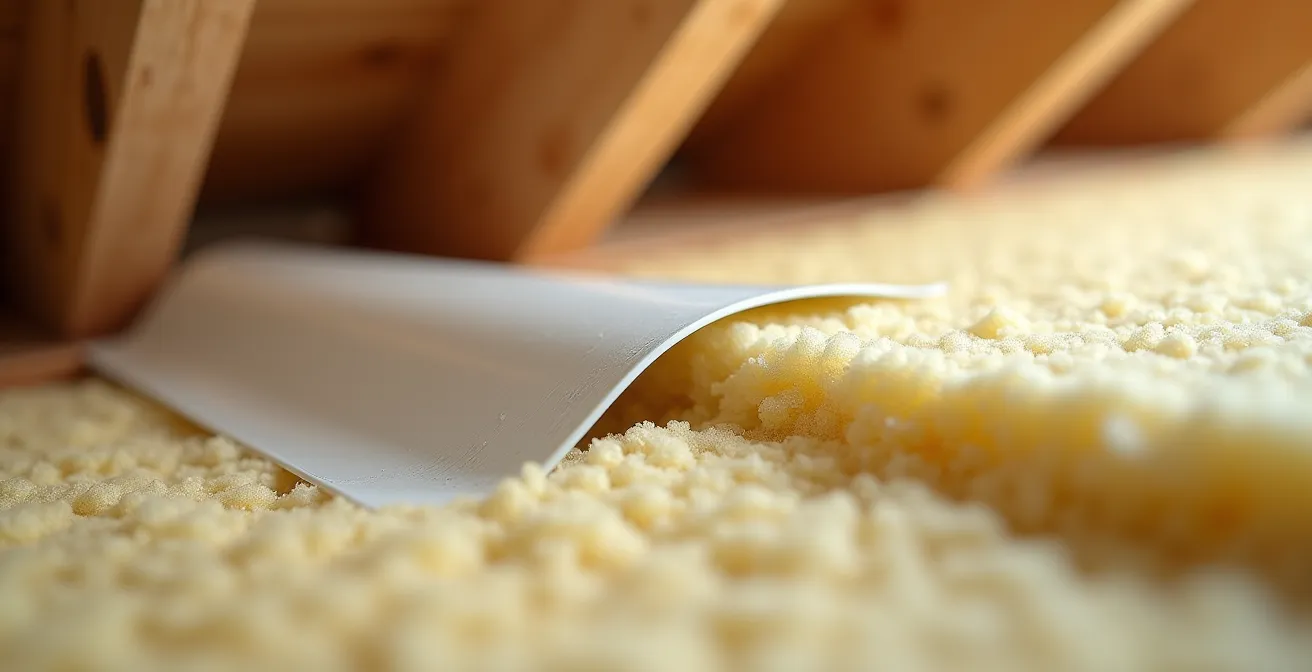
As this image shows, the baffle creates a protected channel ensuring airflow is maintained. A minimum gap of 25mm should always be preserved between the insulation and the roof felt. Another key safety point concerns electrical wiring. High-power cables, such as those for electric showers, can overheat if buried under 270mm of insulation. It’s imperative to always lay these cables gently over the top of the final insulation layer to allow heat to dissipate safely.
Sheep’s Wool vs PIR Board: Which Is Best for Period Roofs?
While mineral wool is a great all-rounder, the type of property you own—particularly if it’s an older, period home—can influence the best choice of material. Traditional buildings, constructed with materials like stone, lime mortar, and solid brick walls, were designed to be ‘breathable’. This means they naturally manage moisture by allowing it to be absorbed and then released from the building’s fabric. Using the wrong type of modern, non-breathable insulation can disrupt this balance and trap moisture, causing significant problems.
This is where the debate between materials like natural sheep’s wool and rigid Polyisocyanurate (PIR) boards becomes critical. Sheep’s wool is hygroscopic, meaning it can absorb and release large amounts of water vapour without compromising its thermal performance, actively protecting timber joists. PIR boards, on the other hand, are highly efficient insulators but are non-breathable. They act as a vapour barrier, which can be disastrous if moisture gets trapped behind them. For period properties, a breathable solution is almost always the safer and more effective long-term choice.
To help you decide, this table compares the key features of each material, using data compiled from sources like an analysis of insulation installation methods.
| Feature | Sheep’s Wool | PIR Board |
|---|---|---|
| Breathability | Excellent – absorbs and releases moisture | Poor – non-breathable, can trap moisture |
| Installation Flexibility | High – conforms to irregular spaces | Low – requires precise cutting |
| Acoustic Insulation | Excellent sound dampening | Minimal acoustic benefit |
| Moisture Management | Hygroscopic – protects timbers | Risk of rot if not perfectly sealed |
| Cost | Higher initial cost | Lower per m² but requires expert fitting |
The real-world benefits are clear. UK blogger Vikkie Lee documented insulating her Victorian farmhouse loft. After removing a damp, old 100mm layer, she installed over 270mm of eco-friendly glass wool in two layers. The project, which cost around £500 in materials, took 8 hours and led to an immediate improvement in warmth and a projected £450 reduction in quarterly heating bills. While she used glass wool, the principle of using a full, breathable depth is what delivered the results.
The Mistake of Squashing Insulation Under Boarding
One of the most common and damaging mistakes a homeowner can make is compressing loft insulation to create storage space. Many people simply lay boards directly on top of the joists, squashing down 270mm of fluffy insulation into a 100mm gap. The logic seems sound—you get your storage back—but it fundamentally misunderstands how insulation works. Insulation’s effectiveness, its R-value, comes from the thousands of tiny air pockets trapped within its fibrous structure. These pockets are what slow the movement of heat.
When you compress insulation, you squeeze out these air pockets, destroying its thermal performance. It’s not a minor reduction; research shows that compressing insulation by 50% can reduce its R-value by over 50%. You effectively turn your expensive, deep insulation into a thin, inefficient mat. You’ve spent money and time installing 270mm, only to give it the performance of 100-150mm at best. This creates a ‘cold bridge’ where heat can easily escape through the now-conductive insulation and the wooden joists, negating much of your hard work.
The correct approach is to create storage *above* the full depth of insulation. This maintains the integrity of the thermal layer while providing a safe and usable platform. Fortunately, several professional solutions are available that are easy for a competent DIYer to install:
- Raised Loft Storage Systems: Products like LoftZone StoreFloor or generic ‘loft legs’ are specifically designed for this purpose. They are strong, lightweight stilts that screw into the joists, creating a raised sub-frame on which you can lay your storage boards.
- Sufficient Clearance: Ensure you create a minimum clearance of 270mm between the top of the joists and the underside of the new boards to allow the insulation to remain fully expanded.
- Timber Battens: A more traditional method is to fix additional timber battens securely on top of the existing joists to build up the required height before boarding.
- Weight Considerations: Before loading up your new storage area, check that your joist size and spacing can support the intended load. A typical domestic loft is only designed for light storage, around 25kg/m².
How to Check Your Eligibility for the Great British Insulation Scheme
The cost of materials and professional installation can be a barrier for many households. However, in the UK, significant government support is available. The primary route is the Great British Insulation Scheme (GBIS), which runs alongside the wider Energy Company Obligation (ECO4) scheme. GBIS specifically targets homes with poor energy efficiency and aims to deliver single insulation measures quickly and effectively. Many households may be able to get loft insulation installed for free or at a heavily subsidised rate.
Eligibility for GBIS is typically determined by two main factors: your property’s Energy Performance Certificate (EPC) rating (usually D or below) and your council tax band. In England, homes in council tax bands A-D are often eligible. Different rules apply in Scotland and Wales, but the principle is the same: targeting the least efficient homes. You can check your eligibility in minutes on the official government website by entering your postcode and answering a few simple questions about your property and circumstances.
Even if you don’t qualify directly, don’t assume you have to foot the entire bill. There are other avenues for funding that a good advisor or installer can help you navigate. It’s a complex landscape, but one that can yield significant financial help.
Alternative Funding: What if You’re Not Eligible for GBIS?
Energy grant facilitators report that households not meeting the main GBIS criteria can often access support through other routes. These include discretionary grants offered by local councils for vulnerable residents and the ‘ECO Flex’ component of the main ECO scheme, which allows councils to refer households they consider to be in fuel poverty. Going through an approved scheme for professional installation, which costs an average of £300 for a semi-detached home, typically includes a 25-year guarantee, providing peace of mind. Official data on the scheme shows that while cavity walls are the most common measure, loft insulation has accounted for 28% of installations under GBIS, demonstrating its importance.
Why Internal Insulation Can Cause Rot in Joist Ends
While loft insulation is a primary focus, homeowners sometimes consider insulating other areas internally, such as the walls of a room-in-roof or a cold attic room. This is a far more complex and risky undertaking than simply laying insulation on the loft floor. Applying internal wall insulation (IWI) incorrectly can trap moisture within your home’s structure, leading to serious issues like rot in the ends of your floor or roof joists. This happens because you fundamentally alter the building physics of the wall.
An uninsulated wall allows warmth from the room to keep the entire structure above freezing. When you add internal insulation, the original wall behind it becomes much colder. Warm, moist air from inside your home can still find its way through tiny gaps in the insulation. When this vapour hits the now-cold wall surface, it reaches its ‘dew point’ and condenses into liquid water. This moisture becomes trapped between the insulation and the wall, creating a permanently damp environment perfect for mould growth and the decay of embedded timber joists. This is known as interstitial condensation.

As the diagram suggests, the location of the dew point migrates into the wall structure, creating a risk zone. This is why professional installation is not just recommended; it’s essential. An expert will assess the specific wall construction and model the potential for moisture movement to ensure a safe and effective result.
Before even considering internal wall insulation, a professional would perform a risk analysis (like a WUFI calculation) to model moisture movement.
– Energy Saving Trust, Solid Wall Insulation Technical Guide 2024
Why Heat Pumps Fail to Warm Houses with Microbore Pipework
Improving your home’s insulation is the first step towards a low-carbon heating system like an Air Source Heat Pump (ASHP). However, even in a perfectly insulated house, a heat pump installation can fail if the existing infrastructure isn’t compatible. A common culprit in UK homes built or refurbished from the 1970s onwards is microbore pipework. This system uses very narrow copper pipes, typically 8mm or 10mm in diameter, to feed radiators, as opposed to the standard 15mm or 22mm pipes used today.
The problem is one of flow rate. Gas boilers heat water to a very high temperature (60-80°C) and blast it through the system. They can force enough hot water through narrow microbore pipes to heat the radiators. Heat pumps, however, work on a ‘low and slow’ principle, producing a larger volume of water at a much lower temperature (35-45°C). Microbore pipes simply cannot carry a sufficient volume of this lower-temperature water to get the radiators hot enough, leaving the house feeling lukewarm no matter how hard the heat pump works.
Before considering a heat pump, it’s crucial to identify if you have microbore pipework. A quick self-diagnosis is often possible:
- Check Pipe Diameter: Look at the pipe coming out of your radiator valve. If it’s about the width of a pencil, it’s likely 8mm or 10mm microbore. Standard 15mm pipe is closer to the width of a thumb.
- Count Radiators: Note how many radiators are fed by a single run of narrow pipe. The more radiators on one circuit, the worse the flow rate will be at the end of the line.
- Assess Replacement Feasibility: While a full re-pipe is expensive, sometimes just replacing the main distribution pipes with standard-bore piping, leaving the final microbore connections to the radiators, can be enough to solve the issue.
A Workaround: The Buffer Tank Solution
For homes with extensive microbore systems, there is a viable alternative to a full, disruptive re-piping. Renewable energy installers report that installing a buffer tank can successfully ‘decouple’ the heat pump from the radiator circuit. The heat pump efficiently heats the water in the tank, and a separate pump then circulates this water through the existing microbore system. This solution has enabled successful heat pump installations in many properties with partial or full microbore pipework, at a significantly lower cost than a complete system overhaul.
Key Takeaways
- Maintain a 25mm air gap at the eaves when insulating your loft to prevent condensation and structural rot.
- Compressing insulation by 50% can halve its thermal performance. Always use loft legs or a raised system for storage.
- For older, ‘breathable’ properties, hygroscopic materials like sheep’s wool are often superior to non-breathable PIR boards for moisture management.
Air Source Heat Pumps: Are They Viable for Older UK Properties?
The conversation around home energy often leads to Air Source Heat Pumps (ASHPs) as the future of domestic heating. Yet, despite government grants and a push towards decarbonisation, adoption remains low. Recent data shows that just 1% of UK homes currently use them. For owners of older properties, the question looms large: are they a viable option? The answer is a conditional ‘yes’—but it requires excellent insulation and, just as importantly, a fundamental shift in mindset.
A heat pump is not a like-for-like replacement for a gas boiler. Attempting to use it like one is the single biggest reason for dissatisfaction. A boiler provides high-temperature, on-demand heat. A heat pump provides low-temperature, constant background warmth. It’s about maintaining a stable, comfortable temperature 24/7, not blasting the house with heat for an hour in the morning and evening. This ‘low and slow’ approach is highly efficient but only works in a home that can retain that gentle heat—which is why ‘fabric first’ (insulation and draught-proofing) is the unbreakable rule.
Understanding this operational difference is crucial for a successful transition. The following table, based on guidance from the Energy Saving Trust about the UK heating market, highlights the required change in thinking.
| Aspect | Gas Boiler (High & Fast) | Heat Pump (Low & Slow) |
|---|---|---|
| Operating Temperature | 60-80°C water temperature | 35-45°C water temperature |
| Heating Pattern | On/off cycles, rapid heating | Constant low-level warmth |
| Best Practice | Heat only when needed | Maintain steady temperature 24/7 |
| Energy Use | High peaks, zero between cycles | Lower continuous consumption |
| Comfort Level | Temperature fluctuations | Stable, consistent warmth |
With a well-insulated home forming the foundation, the next logical step is to evaluate your entire heating system. Assess whether your current setup, including radiators and pipework, is optimised for the low-and-slow heat delivery required to truly maximize your energy savings and future-proof your home.