Great lighting isn’t about the fixtures you choose, but the control infrastructure you build behind the walls.
- Single-circuit grids create flat, sterile environments; multiple circuits create “scenes.”
- Planning must happen before the first fix to integrate 5-amp sockets and zoning.
Recommendation: Map your furniture layout first, then design your circuits to separate task, ambient, and feature lighting into distinct controllable zones.
You have likely stood in a newly renovated kitchen-diner that felt less like a home and more like an airport runway. The space is vast, the finishes are premium, yet the atmosphere is sterile. The culprit is rarely the choice of pendant or shade, but rather a fundamental failure in circuit architecture. When one switch floods the entire room with uniform brightness, you lose the ability to live comfortably in that space.
Most renovators treat lighting as a decorative afterthought, selecting fixtures based on aesthetics long after the wires are sealed behind plaster. However, as an electrical planner, I view lighting through the lens of “scenes.” A kitchen needs to transition from a high-intensity workspace at 6 PM to a moody entertaining zone by 8 PM. This versatility relies entirely on independent circuits.
But if the answer isn’t just “more lights,” what is it? The secret lies in decoupling your light sources. By moving away from the standard grid and embracing a zoned approach—utilizing 5-amp sockets, perimeter lighting, and architectural circuits—you regain control over the mood of your home. This guide will walk you through the structural planning required to banish the runway effect forever.
To help you navigate this technical planning phase, the following summary outlines the critical zones and considerations.
Table of Contents: A Circuit-Based Approach
- 49.1:Why You Need 4 Circuits for a Kitchen-Living Space
- 49.2:How to Set Up 2-Way Switching for Walk-Through Zones
- 49.3:Downlights vs 5-Amp Sockets: Which Creates Better Ambience?
- 49.4:The Positioning Mistake That Blinds You While Watching TV
- 49.5:When to Draw the Lighting Plan: Before the First Fix Chase
- 2.3:Broken Plan vs Open Plan: Which Suits Family Life Better?
- 30.1:Why Silent Extraction Fans Are Critical for Sleeping Zones
- 30:Open Plan Master Suites: How to Solve Moisture Issues from the En-Suite?
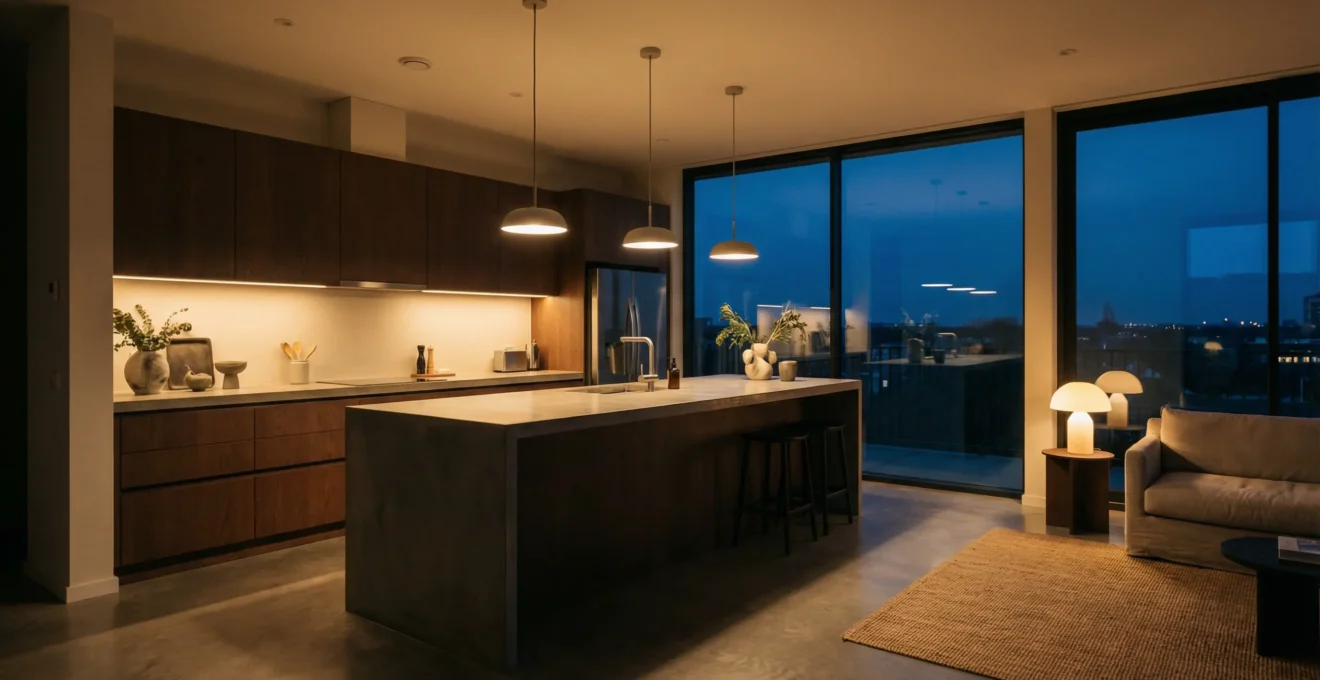
Why You Need 4 Circuits for a Kitchen-Living Space
In an open-plan environment, relying on a single lighting circuit is the architectural equivalent of having only one volume setting on your television: maximum. To create a livable space, you must think in terms of layers. At a minimum, a large kitchen-diner requires four distinct circuits to function effectively: task, ambient, feature, and perimeter.
The task circuit covers high-intensity areas like worktops and the hob, ensuring safety during preparation. The ambient circuit usually involves dimmable overheads that provide general fill light. The feature circuit handles decorative elements like pendants over an island or dining table, which serve as visual anchors. Finally, the perimeter circuit washes walls or highlights joinery, expanding the sense of space without overwhelming the eye. This layered approach is not just a luxury; it is often a regulatory necessity. In fact, for new kitchen builds, the NEC code requires at least 8 circuits generally, emphasizing how power-hungry and complex these modern multi-functional spaces have become.
By separating these functions, you can create distinct “scenes.” You might have the feature and perimeter circuits on while watching a movie, or the task and ambient circuits blasting while cleaning. Without this separation, you are forced to light the sofa area just to see the kettle, destroying any potential for coziness.
How to Set Up 2-Way Switching for Walk-Through Zones
Nothing disrupts the flow of an open-plan space more than having to walk across a dark room to turn on a light, or worse, having to backtrack to turn one off. Two-way switching (or 3-way in North America) is the backbone of fluid movement in large zones. It allows a single lighting circuit to be controlled from two different locations, typically at the entry and exit points of a thoroughfare.
In a large kitchen-diner, this is non-negotiable. You should be able to turn on the kitchen “arrival” lights from the hallway door, and turn them off from the switch panel near the patio doors or the living area. This requires specific planning during the wiring phase. You need to run a three-core and earth cable between the two switch positions, linking the “common” and “traveler” terminals correctly.
The following image illustrates the seamless integration of a switch at a key entry point, demonstrating how accessibility defines comfort.
As depicted, the switch is positioned exactly where the hand naturally reaches upon entry. This ergonomic placement, combined with correct wiring, ensures that the lighting system supports the inhabitants’ movement rather than hindering it. For those tackling the wiring themselves or supervising an electrician, understanding the connection of 2 Single Pole Double Throw (SPDT) switches is essential to getting this logic right.
Downlights vs 5-Amp Sockets: Which Creates Better Ambience?
A common error in modern renovations is the “polka-dot effect”—ceilings riddled with grid-aligned downlights. While effective for cleaning, this approach rarely creates a relaxing atmosphere. For true ambiance, especially in the living zone of an open-plan room, low-level lighting is superior. This is where the 5-amp circuit becomes your secret weapon.
A 5-amp circuit connects a series of specific round-pin sockets to a wall switch (often a dimmer). This allows you to plug in floor and table lamps and control them all simultaneously from the room’s main entrance. Instead of walking around turning on three different lamps manually, one click sets the mood. This technique shifts the light source from the ceiling to eye level, instantly making the space feel warmer and more intimate.
As noted by lighting experts, relying solely on overheads is a design failure. Cat Lighting Design Consultants warn that rows of symmetrical downlights will “cast a bland, shadowless and potentially glary wash of light,” which effectively kills any sense of ambiance. In contrast, using a dedicated 5-amp circuit for lamp control allows you to integrate decorative fixtures into your hardwired lighting plan.
The Positioning Mistake That Blinds You While Watching TV
In an open-plan layout, the relationship between your light sources and your television screen is critical. A classic mistake is placing downlights directly above or in front of the TV area. This creates glare on the screen and eye strain for the viewer, as the pupil struggles to adjust between the bright screen and the dark room. The solution is bias lighting.
Bias lighting involves placing a soft light source behind the television screen. This raises the ambient light level in the viewer’s field of vision without shining directly into their eyes or onto the screen. It improves the perceived contrast of the image and significantly reduces fatigue. The goal is a soft glow, not a spotlight.
This concept is visually demonstrated below, showing how light behind the screen creates a comfortable viewing halo.
As you can see, the light washes the wall rather than the viewer. For the best results, industry professionals recommend sources that mimic daylight, and calibrate screens to 6500K to ensure color accuracy and comfort. Planning a socket behind the TV specifically for an LED strip is a small detail that makes a massive difference.
When to Draw the Lighting Plan: Before the First Fix Chase
The single biggest reason lighting plans fail is timing. If you wait until the electrician is on-site with a chasing tool to decide where lights go, you have already lost. The lighting plan must be finalized in conjunction with the furniture layout before the first fix (the stage where cables are run inside walls).
You need to know exactly where the sofa will sit to position the 5-amp floor sockets. You need to know the dining table’s dimensions to center the pendant feeds. As Claire Pendarves from Luxplan Lighting Design notes, planning where the furniture will go in the open plan space “will reap vast rewards” in the final effect. Retrofitting these elements is expensive and messy.
Your Pre-First-Fix Lighting Roadmap
- Furniture Mapping: Finalize the exact position of the sofa, dining table, and reading chairs on your floor plan.
- Socket Spotting: Identify floating furniture zones and mark floor plug locations (standard or 5-amp).
- Structural Check: Review joist direction and depth to ensure recessed lights can actually fit where planned.
- Circuit Splitting: Group your lights into logical circuits (Task, Ambient, Feature) for automation compatibility.
- Future-Proofing: Add extra floor sockets now, even if not immediately needed, to allow for layout changes later.
Broken Plan vs Open Plan: Which Suits Family Life Better?
While open plan living is popular, “broken plan” is often more practical for family logistics. This design philosophy uses structural elements—like half-walls, shelving units, or changes in floor level—to keep the sense of space while creating distinct zones. Lighting plays a pivotal role here, acting as a virtual wall.
By zoning your lighting circuits effectively, you can visually separate the kitchen from the lounge without a physical barrier. A bright, cool-toned circuit over the kitchen island defines it as a workspace, while a warm, dimmable circuit over the snug area defines it as a place of rest. Using light as a virtual wall allows you to manipulate the perceived boundaries of the room.
As Richard Gill Architects point out, conflicting uses of space lead to conflicting lighting needs. The crucial takeaway is that “it should not be intended that all circuits will be switched on at the same time.” The ability to darken the kitchen while the lounge is lit effectively “closes the door” on the dirty dishes, even if that door doesn’t exist.
Why Silent Extraction Fans Are Critical for Sleeping Zones
In modern renovations, en-suites and bedrooms are increasingly merging into open layouts. In this context, the noise of an extraction fan is no longer just a bathroom issue; it becomes a bedroom issue. If your en-suite is open to the sleeping area, a standard noisy fan triggered by the light switch is a disaster for sleep hygiene.
You must separate the fan’s operation from the lighting circuit. Ideally, wire the fan to a humidistat so it operates automatically only when moisture is detected, and ensures it runs on a timer. Crucially, the fan unit itself needs to be specified for silence. A fan sounding like a jet engine will wake a sleeping partner the moment the bathroom light is toggled.
The installation is just as important as the hardware. Mounting the fan with vibration-isolating brackets prevents the resonance from traveling through the stud walls, effectively turning your wall into a speaker. For a master suite, investing in a unit rated below 25dB is essential to maintain the tranquility of the sleeping zone.
Open Plan Master Suites: How to Solve Moisture Issues from the En-Suite?
When walls come down between the bedroom and the bathroom, moisture control and electrical safety become paramount. You are effectively bringing water sources into a dry zone. Lighting fixtures near the bath or shower must carry the correct IP (Ingress Protection) rating, even if the space feels open.
Electrical regulations define specific zones around water sources. Generally, fixtures within a certain radius of the water source must be rated for damp locations. For example, fixtures installed within 3 feet horizontally and 8 feet vertically of a bathtub typically require strictly rated fixtures. Ignoring this puts the entire circuit at risk of tripping due to condensation ingress.
The image below highlights the reality of moisture in these zones, emphasizing why robust fixtures are necessary.
Even with excellent extraction, condensation will form. Choosing fixtures with appropriate seals ensures longevity and safety. In an open-plan suite, this technical compliance must be balanced with aesthetics, selecting IP-rated fixtures that match the bedroom’s decor to maintain visual continuity.
Key Takeaways
- Circuit Separation: Never put a large open-plan room on a single circuit; use at least four (Task, Ambient, Feature, Perimeter).
- Control is Key: Use 5-amp sockets for lamps to bring lighting control to the wall switch and avoid the “polka-dot” ceiling effect.
- Plan Early: Lighting positions must be decided before the first fix, based on a finalized furniture layout.
Conclusion: The Power of Invisible Architecture
Lighting is the invisible architecture of your home. While walls define the physical space, circuits define the emotional space. By breaking your large open-plan room into functional zones using 5-amp sockets, 2-way switching, and layered circuits, you create a home that adapts to your life rather than forcing you to adapt to it.
The difference between a sterile showroom and a cozy home often comes down to the ability to dim the perimeter, switch on a table lamp from the door, and hide the kitchen mess in shadow while you relax. A well-executed lighting plan is one you never notice, simply because it works perfectly.
Review your current electrical plan today and ask yourself: “Do I have a scene for relaxing, or just a switch for seeing?” If the answer is the latter, it’s time to redraw the circuits.
Frequently Asked Questions about Zoning Open Spaces with Light
How many lighting circuits do I need for a kitchen-diner?
For a functional and atmospheric open-plan space, you should aim for a minimum of four circuits: Task (cooking areas), Ambient (general fill), Feature (pendants/dining), and Perimeter (walls/curtains). This separation allows you to create different moods for cooking, dining, and relaxing.
What is a 5-amp lighting circuit?
A 5-amp circuit is a dedicated lighting circuit that uses specific round-pin sockets. It allows you to plug in floor and table lamps and operate them from a standard wall switch or dimmer at the room’s entrance, eliminating the need to turn each lamp on individually.
Can I retrofit zoned lighting without rewiring?
It is difficult to achieve true hardwired zoning without rewiring. However, smart bulbs and wireless switching systems (like Philips Hue or Lutron Caséta) can simulate zoning by grouping bulbs via an app, allowing for “scene” control without opening up the walls.
Where should I place switches in an open plan room?
Switches should be placed at every major entry and exit point of the zone. Use 2-way or 3-way intermediate switching so you can turn lights on when you enter from the hallway and turn them off when you exit to the garden or go upstairs, preventing the need to walk across a dark room.