Casting in-situ concrete is not about pouring cement; it is about engineering a monolithic stone feature that integrates perfectly with the architecture.
- Plasticisers and proper curing are non-negotiable for preventing shrinkage cracks.
- Glass Fiber Reinforced Concrete (GFRC) offers a superior strength-to-weight ratio over steel rebar.
Recommendation: Adopt a “liquid stone” mindset by prioritizing formwork precision and chemical additives over water volume to ensure structural integrity.
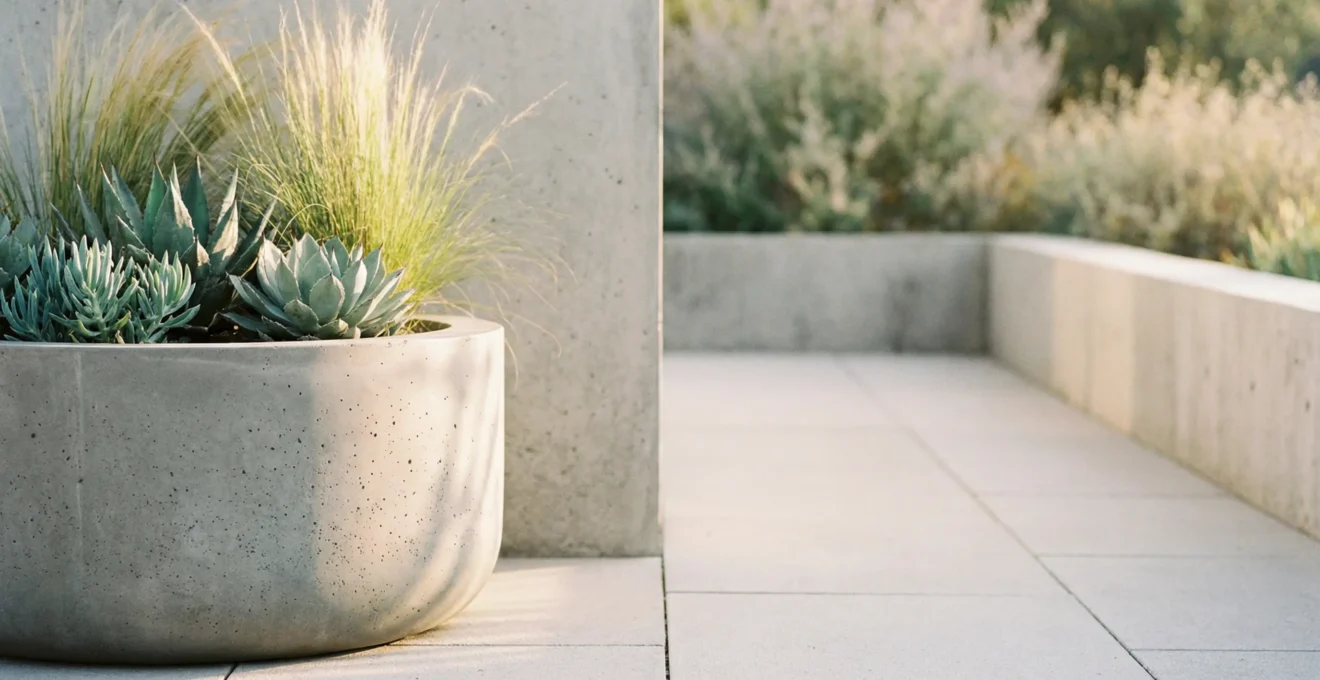
Every landscape designer knows the frustration of sourcing furniture that almost fits. You find a planter with the right texture but the wrong dimensions, or the right size but a finish that feels temporary and cheap. The allure of in-situ concrete lies in its permanence; it promises a feature that feels extruded from the building itself, rather than placed upon it. However, the gap between the vision of a sleek, monolithic volume and the reality of cracked, honeycombed grey surfaces is often vast.
The usual advice suggests mixing a standard bag of cement and hoping for the best. This approach ignores the complex chemistry of hydration and the mechanical stresses of hydrostatic pressure. To treat concrete as “liquid stone,” we must move beyond basic masonry techniques and look at high-performance casting methods used in architectural facades. From GFRC (Glass Fiber Reinforced Concrete) to advanced plasticisers, the technology exists to create flawless surfaces.
But if the key to a seamless look wasn’t just in the mix, but in the microscopic management of air and water? This guide dismantles the traditional pouring process to reconstruct a methodology focused on precision, density, and chemical control.
The following sections detail the technical roadmap to achieving architectural-grade concrete features, directly addressing the common failure points in custom landscape design.
Table of Contents: Mastering the Monolith
- Why Your Concrete Cracked and How to Use Plasticisers
- How to Build Melamine Shutters for a Glass-Smooth Finish
- Steel Rebar vs Glass Fibre: Which Prevents Rust Bleed?
- The Air Bubble Error That Ruins the Surface Aesthetics
- How to Slow Cure Concrete to Prevent Shrinkage Cracks
- How to Secure Plants on a Windy High-Rise Balcony
- How to Prepare a Concrete Subfloor for Solid Oak Parquet
- Herringbone vs Chevron: Which Parquet Style Suits a Modern Extension?
Why Your Concrete Cracked and How to Use Plasticisers
The most common failure in in-situ casting is the appearance of hairline fractures before the planter has even held soil. The instinct is often to add water to the mix to make it flow better into the corners of the formwork. This is a fatal error. Excess water evaporates, leaving behind microscopic voids that weaken the matrix and lead to shrinkage. To achieve a seamless finish, we must decouple workability from water content.
This is where plasticisers—specifically superplasticisers—become essential. These chemical admixtures charge the cement particles, causing them to repel each other and creating a fluid, pourable slurry without compromising the water-cement ratio. The result is a mix that flows like a milkshake but cures with the density of granite. Visualizing this difference is key to understanding why professional mixes behave differently from standard hardware store bags.
As seen in the macro texture above, a correctly plasticised mix maintains a creamy, cohesive consistency where aggregates are fully suspended. There is no bleed water rising to the top, which ensures that the surface remains uniform and free of the weak, chalky layer that often plagues wet mixes.
To implement this effectively, follow this prevention protocol:
- Step 1: Maintain appropriate mix design water-cement ratios – this is critical to reducing shrinkage cracking potential.
- Step 2: Use admixtures (plasticizers) to increase slump and workability instead of adding water.
- Step 3: Moisten the subgrade before pouring to prevent water from being absorbed into dry soil.
- Step 4: Cool down rebar prior to placing if working in hot conditions.
- Step 5: Immediately cure the surface with a moisture evaporation inhibitor or curing compound.
Once the chemistry of the mix is stabilized, the focus must shift to the containment vessel that will define its shape.
How to Build Melamine Shutters for a Glass-Smooth Finish
In casting, the formwork is the negative of the final reality. Any imperfection in the shuttering—a scratch, a screw head, or a grain pattern—will be immortalized in the cured concrete. For designers seeking that contemporary, industrial-chic “glass” finish, standard plywood is insufficient due to its transferring grain. Melamine-faced particleboard offers the ideal non-porous surface, but it requires surgical precision in assembly.
The rigidity of the formwork is paramount. Concrete exerts immense hydrostatic pressure, pushing outward with significant force. If the melamine flexes, the planar surfaces will bow, ruining the geometric purity of the design. Using a thicker carcass or reinforcing the melamine with timber ribs is not optional; it is a structural necessity for maintaining straight lines.
Achieving a flawless mold requires a strict assembly sequence:
- Step 1: Cut melamine panels precisely using a circular saw with a straightedge guide for clean edges.
- Step 2: Always predrill screw holes – driving screws into undrilled melamine will cause bulging or splitting that creates dimples in the cast surface.
- Step 3: Attach sides to wrap around the outside of the base plate, using pocket-hole joinery or perpendicular screws.
- Step 4: Seal all corners and joints inside the form with latex caulk to prevent concrete from escaping.
- Step 5: Seal cut edges of melamine with varnish or tape to prevent moisture absorption and swelling during cure.
With the mold prepared, we must address the internal skeleton that gives the planter its tensile strength.
Steel Rebar vs Glass Fibre: Which Prevents Rust Bleed?
Traditional steel reinforcement (rebar) presents a significant risk for thin-walled architectural planters: oxidation. Concrete is porous; over time, moisture penetrates to the steel, causing it to rust. As rust expands, it cracks the concrete from within (spalling) and bleeds unsightly orange stains onto the surface. For a designer, this ruins the clean aesthetic.
Glass Fiber Reinforced Concrete (GFRC) utilizes alkali-resistant glass fibers dispersed throughout the mix. This creates a multidirectional strength matrix that eliminates the need for a thick protective cover of concrete required by steel. Consequently, fiberglass reinforcement decreases required planter wall thickness by approximately 60%, allowing for sleek, lightweight designs that steel cannot replicate.
To visualize the structural difference, consider the composition of the matrix itself.
The image above illustrates how the glass fibers integrate into the wet slurry, providing 3D reinforcement rather than the 2D grid of traditional steel. This allows the concrete to be cast thinner and lighter without sacrificing durability.
The following table compares the implications of both materials for planter design:
Designers must weigh structural requirements against aesthetic longevity, as detailed in this comparative material analysis.
| Characteristic | Steel Rebar | GFRC (Glass Fiber Reinforced) |
|---|---|---|
| Minimum Wall Thickness | 50mm+ (requires cover depth) | 19mm (¾ inch) possible |
| Weight Reduction | None – adds weight | Up to 75% lighter |
| Corrosion Risk | High – requires 40-50mm concrete cover | None – alkali-resistant fibers |
| Rust Staining | Yes – causes spalling over time | No corrosion possible |
| Flexural Strength | Good directional strength | Superior 3D multidirectional strength |
| Ideal Application | Thick structural elements | Thin-walled planters, decorative elements |
Even with the right reinforcement, surface defects can occur if trapped air is not managed correctly.
The Air Bubble Error That Ruins the Surface Aesthetics
The “Swiss cheese” effect, or bug holing, occurs when air pockets trapped in the viscous mix migrate to the formwork face and adhere there during curing. In architectural concrete, these voids disrupt the visual continuity of the surface. While some designers appreciate the raw look, unintentional pitting usually signifies poor consolidation.
Eliminating these voids requires mechanical intervention. Vibration liquefies the mix temporarily, allowing low-density air bubbles to rise to the surface. However, over-vibration can cause aggregate segregation, where heavy stones sink to the bottom. The sweet spot lies in short, intense bursts of vibration combined with the correct chemical release agents.
Release Agent Selection Impact on Concrete Surface Quality
Release Agent Selection Impact on Concrete Surface Quality
A practical demonstration comparing release agents shows that proper mold preparation is critical for defect-free surfaces. Using clean vegetable oil or dedicated release agents on non-silicone molds significantly improves demolding success. The key learning: forgetting to apply release agent results in difficult removal and potential surface damage. The oil does not mix with cement and creates a separation layer, but excessive application near drainage holes can loosen adhesive bonds. Purpose-made form release oils outperform household alternatives like cooking oil or diesel which can stain concrete or prevent subsequent sealing.
To ensure a pristine surface, follow this consolidation checklist:
- Step 1: Vibrate the wet mix immediately after casting – tap on all sides and corners of the mold to release trapped air.
- Step 2: For larger items, use a rubber mallet to pound on the mold exterior creating vibration that forces bubbles to migrate to the surface.
- Step 3: Apply form release agent properly – spray inside cavity walls and rub in smoothly to prevent bubbles from the oil itself.
- Step 4: Use flow control admixtures if using silicone molds to achieve runnier consistency without excess water.
- Step 5: Post-cure bug hole repair: create a slurry using the same cement mix to fill pinholes for a perfect color match.
Once cast, the concrete enters its most critical phase: the cure.
How to Slow Cure Concrete to Prevent Shrinkage Cracks
Curing is not drying; it is a chemical reaction (hydration) that requires moisture. If concrete dries out too quickly, the hydration process halts, and the matrix collapses, leading to dusting and structural weakness. The goal is to keep the moisture in the concrete for as long as possible to allow the crystalline bonds to fully develop.
For designers accustomed to fast-paced construction timelines, this requires a shift in scheduling. The formwork should remain in place to act as a moisture barrier. When exposed, the surface must be kept wet. Scientific data indicates that moist-cured concrete can be up to 50% stronger than air-dried samples. This strength is crucial for planters that will bear the outward pressure of wet soil and root systems.
To manage the cure profile effectively:
- Step 1: Spray or mist newly poured concrete with water 5-10 times per day for the first 7 days – this allows moisture to evaporate slowly.
- Step 2: If unable to spray frequently, cover with polyethylene sheeting (minimum 4mm thick) or curing blankets to trap moisture.
- Step 3: Maintain concrete temperature between 50°F and 85°F – use insulated blankets in cold weather, shade in hot weather.
- Step 4: Apply membrane-forming curing compound if wet curing isn’t feasible – this creates a protective film to reduce moisture loss.
- Step 5: Leave formwork in place for 48-72 hours as it acts as a moisture barrier during the critical early curing phase.
When the planter is destined for a high-rise application, weight and wind load become the primary design constraints.
How to Secure Plants on a Windy High-Rise Balcony
Designing for elevated spaces introduces variables that ground-level projects ignore. A concrete planter on a 20th-floor balcony is subjected to higher wind shear and imposes a “dead load” on the building’s cantilevered structure. Traditional solid concrete is often too heavy. This is where the reduced weight of GFRC becomes a functional necessity, not just an aesthetic choice.
The stability of the installation relies on lowering the center of gravity. While the planter itself may be lightweight GFRC, the drainage layer acts as the ballast. Using dense river rock at the base, rather than lightweight expanded clay aggregates, anchors the vessel against wind gusts without exceeding the balcony’s structural load limit.
GFRC Planters for Rooftop and Balcony Applications
GFRC Planters for Rooftop and Balcony Applications
Commercial planter specialists demonstrate that lightweight GFRC concrete planters with walls as thin as half an inch are specifically engineered for rooftop and elevated installations where weight is a critical constraint. The material’s hybrid composition of glass fiber, concrete, and resin creates planters that won’t add excessive stress to building structures while remaining durable against city streetscape elements including water, wind, and temperature fluctuations. For stability in high-wind environments, the planter design incorporates raised reinforced bottoms that can accommodate recessed casters, demonstrating how engineering solutions address mobility without compromising stability.
Often, these planters sit atop concrete subfloors that require meticulous preparation, whether for the planter itself or adjacent interior flooring.
How to Prepare a Concrete Subfloor for Solid Oak Parquet
In many modern designs, the in-situ concrete planter is part of a seamless transition from interior to exterior. Ensuring the concrete substrate is prepared correctly is vital, especially if it extends indoors to meet solid oak flooring. The principles of moisture management and leveling apply equally to the planter base and the interior slab. A concrete subfloor that is not properly cured or sealed will transmit moisture to adjacent timber, causing warping.
The “slab-on-grade” must be treated as a dynamic entity. Before any overlay or adjacent joinery is installed, the relative humidity (RH) of the concrete must be stabilized. Industry standards dictate that concrete subfloors must achieve below 75% relative humidity before humidity-sensitive materials like oak are introduced. Ignoring this leads to catastrophic bond failure or material deformation.
Concrete Subfloor Audit Plan
- Points of contact: lister tous les canaux où le signal est émis
- Test relative humidity using a Calcium Chloride test or in-situ probe – ensure RH is below 75% before laying oak to prevent cupping and buckling.
- Apply liquid epoxy DPM (Damp Proof Membrane) even on dry-looking concrete to create a chemical barrier between alkaline concrete and acidic wood tannins.
- Check surface flatness tolerances – solid oak requires 3mm tolerance over 3m, stricter than floating floors.
- Apply high-compressive strength self-leveling compound where needed – it must withstand shear stress from wood expansion and contraction.
Finally, the aesthetic integration of the planter often involves coordinating with the surrounding paving or flooring patterns.
Key Takeaways
- Water-cement ratio controls strength; plasticisers control workability.
- Melamine formwork is essential for a glass-smooth architectural finish.
- GFRC creates lighter, stronger, rust-free planters compared to steel rebar.
Herringbone vs Chevron: Which Parquet Style Suits a Modern Extension?
When an in-situ concrete planter forms the boundary of a modern extension, the choice of the adjacent flooring pattern—whether timber parquet or cast concrete pavers—defines the spatial energy. The contrast between the monolithic, stillness of the concrete planter and the rhythmic geometry of the floor is a powerful design tool. Understanding the directional impact of patterns like Herringbone and Chevron allows the designer to manipulate the perceived size of the space.
Chevron, with its continuous “V” shape, creates a strong directional arrow that draws the eye outward, effectively elongating a room or terrace. It complements the clean, sharp lines of a minimalist concrete planter. Herringbone, with its woven, staggered joint, offers a more traditional, textured look that can soften the brutalism of a large concrete volume. The choice should be driven by the architectural intent: do you want to direct the gaze (Chevron) or hold the gaze (Herringbone)?
The table below breaks down the visual and technical implications of each pattern to help align the floor with your concrete features:
As demonstrated in this aesthetic comparison, the pattern choice impacts material waste and installation complexity.
| Characteristic | Herringbone Pattern | Chevron Pattern |
|---|---|---|
| Visual Effect | Woven texture, expands perceived width, busier appearance | Continuous arrow lines, elongates room, cleaner aesthetic |
| Joint Angle | 90-degree staggered joints | Sharp 45-degree geometric alignment |
| Architectural Style Fit | Traditional, classic aesthetics | Modern, minimalist concrete extensions |
| Board Requirements | Standard rectangular boards | Requires left and right angled boards |
| Material Waste Factor | Lower waste (standard cuts) | 15-20% higher waste (every board cut at angle) |
| Best Room Shape | Wide rooms needing texture | Narrow extensions needing elongation |
Master the mix, control the cure, and respect the formwork. Start your next project by sourcing the right plasticiser rather than just more cement.
Frequently Asked Questions about Casting In-Situ Concrete Planters
Why are GFRC planters better for balconies than traditional concrete?
GFRC planters achieve the architectural presence of concrete with a significantly improved strength-to-weight profile. They are substantially lighter than cast concrete while maintaining durability, making them easier to position and more practical for balconies and rooftops where weight and dead load are design constraints.
What environmental factors should I consider for exposed balcony planters?
Outdoor planters face UV exposure, watering cycles, fertilizer runoff, freeze-thaw in some regions, and heat spikes. With appropriate drainage and routine cleaning, GFRC planters provide long-lived performance. Prioritize scale, drainage, and finish consistency when selecting planters for exposed locations.
How do I prevent planters from tipping in high winds?
Use a heavy drainage layer of gravel or stone rather than lightweight expanded clay at the base to lower the center of gravity. Consider clustering pots to create mutual windbreaks, and select plants with lower drag coefficients – grasses and permeable foliage survive high winds better than broad-leaf plants.